How to paint faux facial stubble


Let's be honest, this isn't really a tutorial as much as it's "how I do it." When I posted the Terminator Librarian, I got a couple requests for how I painted his face and more specifically, his beard or stubble more accurately.

It's a real simple process.
1. Prime black
It's the color I use most of the time.
2. Basecoats
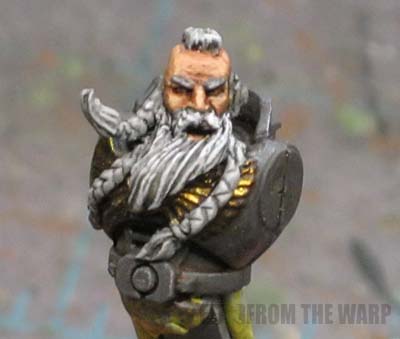
I use a light tan for the skin and silver for the metals. I don't paint eyes and I don't paint teeth. I can't see them at 3 feet away and they're on the side of the model I don't see during the game anyway.
I also leave a thin line of black between colors. It covers any bleed over from the washes and adds to the depth of the face where skin meets metal.
3. Washes
I use a Ogryn Flesh wash on the skin and Badab Black on the metal. Heavy on both.
4. Touch up basecoat
I'll go back with the original base colors and add them back to the raised areas like highlights. Since I went heavy with the wash, there's enough contrast to pull this off. If I want to add a second highlight, this is when I do it, but only to the most raised portions on the face.
5. The stubble
I don't paint heads any different if I'm going to add this step or leave it off. Now is when I add the stubble effect.
I use a medium shade of grey, it's a warm grey but I don't think that matters really. The big question you have to ask yourself is how long ago did he shave? I thin my paint down just a little bit and paint it right on the face where he would have the start of a beard.

Simple as that.
One thin coat = one day growth
Two thin coats = two days growth
After that, you might as well whip out the Greenstuff and add his beard on there.

The last step actually is to go back with a thin Devlan Mud wash and touch up just the recessed areas in the stubble (and the eyesocket for added contrast). This adds the depth back into the face that might have been erased when you were adding the stubble.

And the same thing applies for shaved heads...


Hope this helps, it really is simple to do and it adds a bit of realism. Thankfully, a friend of mine gave me 5 Space Marine heads that I could use to do a bunch of tutorials like this, so look for more in the coming weeks.


UPDATE: For those looking to go the extra distance, this post on sculpting facial hair might help.


Ron, From the WarpIf you've got any questions about something in this post, shoot me a comment and I'll be glad to answer. Make sure to share your hobby tips and thoughts in the comments below!

21 comments:

  1. Thanks for the how to mate, I'm definately going to give this one a go as it certainly adds realism to a model

    ReplyDelete
  2. That works really well, I'm going to go and steal that idea.

    ReplyDelete
  3. Awesome! Thanks for the tutorial.

    ReplyDelete
  4. Great explanation for me painter-newbie. Based on my dwarf-army I am curious how you paint "hair" and "beard"

    Regards from Germany,

    Yitu

    ReplyDelete
  5. It does add a touch of "realism," that's the perfect word for it.

    Yitu: I have a few more unpainted heads and I'll go over doing just that in the coming weeks.

    ReplyDelete
  6. Great little tip - I might give this a try on some of my Guard.

    ReplyDelete
  7. Okay now this might have been covered before, but what would you say is hte ratio of water to grey for the stubble. I would hate to have too much grey or too much water for the stubble. Just a general ratio doesn't have to be exact.

    And thank you for putting this up there, i know that it will come in handy for some of my future models. And i can't wait to see the one on the hair. I have one way i like to do it but it would be nice to learn another way to give some variety.

    Thanks Ron.

    ReplyDelete
  8. Steve: The ratio isn't that important actually, you can do it without water if you want. The only reason I thin my paint is because it can be too thick sometimes.

    If you add too much water, it'll just make it look like it's not that grown in and maybe he shaved that morning.

    As for an actual ratio though, I would say maybe 5:1. I think 5 drops of paint to one drop of water would be enough. You want just enough to make it so you can paint the small areas without the paint flowing into any other places.

    ReplyDelete
  9. Excellent tutorial mate, heads is the one thing I feel lets me down with my models.

    So, I'll definitely get some spares heads and start practising.

    Thanks mate

    ReplyDelete
  10. Great tip Ron.

    As another alternative for people to try when I paint this effect I mix the gray color directly into my last level of highlight and uses that slightly more thinned down to paint in the stubble. The reason I do this is that the gray can sometimes not blend well with the facial tones doing it the way Ron has suggested, for example with a non Caucasian face tone.

    Just use your own judgment and you should be fine.

    ReplyDelete
  11. HuronBH: Good point, It's all about getting the right feel to it and using your own judgement.

    ReplyDelete
  12. Nice and simple but very effective. These are the kind of little touches that make a good mini great.

    Thanks for posting this!


    The war goes on,
    Hessler

    ReplyDelete
  13. I'm glad this has helped out, I honestly didn't think this would get the response it has.

    Fortunately, Steve P. was gracious to give me a couple more heads to work with, so look for a few more of these little "how to's" in the coming weeks.

    ReplyDelete
  14. Great stuff, Ron. I'll have to give that a try - I've never gotten as convincing an effect as you've managed, and I'm thinking it's probably as simple as I'm going too thick with the paint. Definitely going to give this a try on my next guard Vet squad - Thanks for the tutorial!

    ReplyDelete
  15. Thanks Ron, this will come in handy.
    You made it sound simple enough, so i hope i can pull it off!

    ReplyDelete
  16. spot on Ron, wonder if i can fit a little stubble into a Cadian head with helmet...

    ReplyDelete
  17. Hi Ron - thanks for posting this tutorial! I really like the hairline on the recently shaved scalp - great attention to detail!

    ReplyDelete
  18. jabberjabber: The "receeding" hair line adds age to the guy by using a visual clue that people recogise without really even knowing it.

    ReplyDelete
  19. Although its already been said many times, I just also want to say awesome tutorial, I may be trying it out on the terminator squad I'm painting now!

    ReplyDelete
  20. Thanks Ron... just came across this one and I've been wanting to do the shaved head look on a couple of my guys. Possibly some stubble on my IG Hardened Vets.

    ReplyDelete
  21. Okay I was able to try this out last night and I have to say that it is awesome the way that it worked out. I would have never thought that it would have looked that good. Thanks this was a really easy technique that gives you a really great effect.

    ReplyDelete

If you've got a relevant tip, trick or link, make sure to include it in your comment for the rest of us to check out!

Note: Only a member of this blog may post a comment.