When it comes to sculpting facial hair on a model, I try and get around it as best I can before actually committing to sculpting it. I know that's not the best way to start off a tutorial on "how to" do it, but it's true. Avoid it. If you can't avoid it though, you still have some options.
First, you can try the faux painting route
While this is not going to work for the full beard or mowhawk, this is a cool way to get the classic 5 o'clock shadow. Nothing says you have to scuplt everything on a model. In fact, there may be times when painting it on is better. Like this.

This is nothing more than applying some thinned down paint to the areas where you would have "stubble." My favorite for doing this is GW Foundation Charadon Granite. Keep in mind you really do need to thin it down to pull this off. You're far better thinning it too much and having to add a few layers of it than applying too much at once and then having to try and fix it.
You'll need to go back and redefine your shadows if you use this approach. I'll use Devlan Mud or Badab Black and paint that into the deepest recesses only after applying my Granite color. This is because the Granite will flatten out the surface you add it to slightly and you just need to redefine your overall shapes.
Here's a previous tutorial I did on this very process.
Let's say you want the full on facial hair effect
Now it's time to do a little sculpting work. Well maybe not just yet. We all know there are tons of Space Wolf heads out there with all kinds of beards and such. There's no point in reinventing the wheel when you can pick up one of these up. If you've a friend who plays Wolves, then you should be all set.
No Wolves bits and you want to do it yourself
Let's start with the mowhawk. This one is really easy actually. I'm going to recommend you do this to the bit before you glue it onto the model. If for no other reason than it makes it easy to work around. All you need to do is glue it to a bit of sprue so you can hold onto it while working.

To get a mowhawk, you roll out a length of greenstuff in a suitable size. About the same size you want your mowhawk to be in terms of height and width. Once you have it rolled out, cut a short length and lay that on top of your model's head. Press it into place gently so it stays while you work it into shape.
Start with the ends. Cut it to fit on the forehead and the back of the head. Then move on to the sides. Using your sculpting tool, press in on the sides to square up the greenstuff. Then it becomes a matter of working on the sides and top until you turn the rolled piece of greenstuff into a square shape.
After that, it's as easy as pressing in a series of vertical lines across the sides of the mowhawk and stippling the top to create the ends of the hair. This can be done to add roman style crests to helmets as well. If you skip the texturing part at the end, you can use this to add vents to helmets too. This is a handy little sculpting trick with all that it can do.

Here's the very same thing on a bald head to create the classic Custodes look to a model. Something to consider... this really only works for low mowhawks now that I think about it. If you wanted the higher, punk-rock style, it would have to be done a little differently. Maybe I'll cover that in another post since this one is big enough as it is already. It can be done though, it's just a change in the process.
How to sculpt mustaches
These too are fairly easy to do. The real trick with these is getting the greenstuff to stay on the model. Lots of times it will want to peel up as you're working. Patience and keeping at it will see you through.
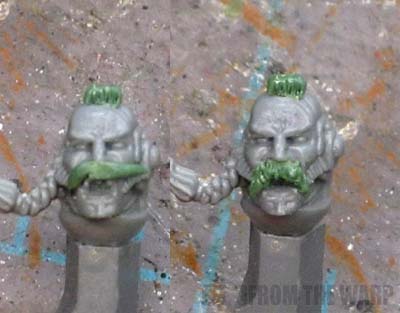
With these, you start with a much smaller roll of greenstuff and press it firmly into place over his upper lip. It's perfectly fine to have more than you need... it actually makes it easier to do if you start with a little excess.
It's a matter of cutting away what you don't want and adding a series of vertical lines into the mustache (to give it texture) until you have the look you want. Mustaches that hang down are a bit tougher to do, but can be done by working over a longer piece of greenstuff.
With this long mustache, I did not add much texture to it at all since the sides were flowing. I had to rely on painting the texture on later to make it look "real." I'd say that if you're going to do a small mustache, add it before you glue the head onto the model. If you're going for the long, flowing mustache, glue the head in place and then add it so you know how it will fall on the model's torso.
One last thing on mustaches... you don't need to press very hard into them to get your texture either. Just a light indentation into the greenstuff otherwise you'll very easily end up cutting it in half.
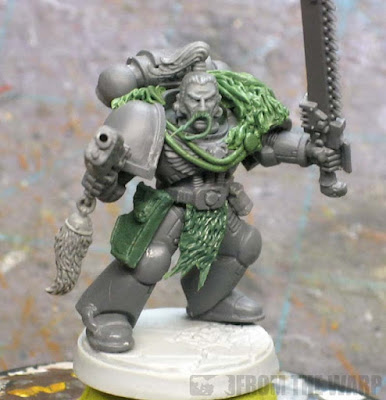
How to sculpt beards
Let me start with beards are done after you glue the head onto the model. This way you have a foundation to work over (the torso) and can sculpt your beard right into place.

I've included a few more pics for this one just to show how it breaks down. You can see I start with the head glued in place. The next thing to remember is that you need to make sure your beard goes "under" your mustache and not on top of it. That's an easy fix, you just need to watch how far up you go on the face. The alternative is to sculpt the beard first and then the mustache on top after that. Another perfectly fine solution.
I start by adding a suitably sized blob of greenstuff just under his chin. Again it's okay to have more than you need, you can always cut the excess away. From there, I will work it up to his face and then down into a rough position at the same time. Step 4 is important... make sure you leave his lower lip showing as hair is not going to grow over that and you'll need to see his mouth. The only way that's going to be covered is if he's sporting a super big mustache.
I keep working the texture of the beard to match the flow of the model (the pose and wind) until I have the effect I want. I also keep cutting away the excess until I have the right amount of hair left for the beard. Don't forget to push in on the underside edges to so it looks like the beard is real and not a huge block sitting there. Just pushing in the underside edges will give it volume and bring it to life.
As an added bonus, how to sculpt braids
What tutorial would be complete without a section on braids? Every Space Wolf player worth his salt has them I'm sure. These are simple in that I don't go for accurate here as much as I go for the feeling of them. By that, I mean my technique may not produce a perfect braid, but it will do for tabletop quality.

I start by placing a thin roll of greenstuff in the location I want the braid. The next step is adding the texture to it. I use a series of angled lines that repeat down the length of the braid... almost to the end. We need to leave a tiny bit at the end to add a ring and the leftover hair that dangles there.
Once you have your repeating angled lines covering the majority of your braid and you've picked a stopping point, you add two horizontal lines close together. This will simulate the ring at the end of the braid holding it all together. Beyond that, it's like sculpting a mini beard and you use your sculpting tool to create a little bit of texture in the hair that is dangling there.
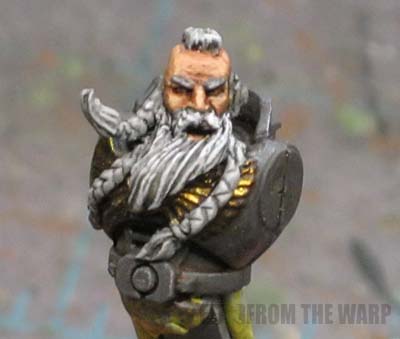
I added two braids on this guy for symmetry. That and I painted his eyebrows super bushy to give him that really old man look. That was nothing more than using a dark grey basecoat followed by a lighter shade of grey inside that. I left a little of the dark grey showing around the edges for effect.
I hope this opens up the idea of sculpting hair on models and how it's really not that hard to do and it can completely change the look of a model by adding the tiniest bit of hair to it.
Make sure to check out these posts as they might help:
How to paint facial stubble without having to sculpt it
