
I know I promised to share how I converted my Death Korps of Krieg Grenadier model way back when and now that I have a test model painted, it's time to do just that. The longest and most time consuming part of this whole project is the conversion work. Believe me, it's not terribly tough, just time consuming since so much is done to each model.
This is a big post folks since it covers the complete construction!

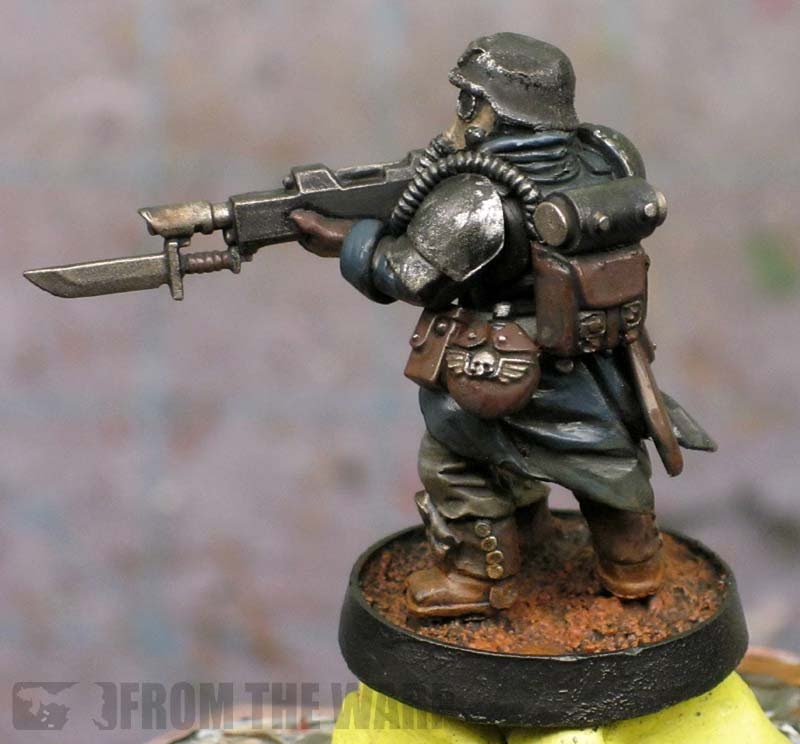
Painting takes about 15 minutes a guy and it actually takes longer for the washes to dry than it does any other part of this. The paint scheme is super simple using 5 colors and a few washes. The idea being to get a nice looking tabletop quality finish so this guy can get on the battlefield.
I'll be covering the painting aspect once I get the squad complete in the next few weeks. For now, I'm going to talk about how I built these guys.
The construction process
This guy is not so much an exact copy of a Grenadier as much as he is a loose representation of one. There are things that are obviously wrong with him when you look at the originals, but I think he captures the feel of the DKOK models and that was the real goal here.
A quick note on cost. After looking up what a squad of these guys would cost from Forge World and then what it would cost to build these on your own, they are pretty close to the same. Where a Guard player would save money is if they already had the Cadian bits they needed lying around.
Specific supplies you will need
This conversion requires a few key pieces to work. Aside from greenstuff and plasticard, you're going to need gas mask heads and greatcoat style legs from Secret Weapon Miniatures. Another tool you should have for this project is the SAW-020 Tentacle Maker from Green Stuff Industries. While this tool in not absolutely essential, I can't imagine trying to make the gas mask hoses without it.
Initial prep work before assembly
There are a few things you'll need to do to the model before you can start building him. There is no particular order to these, but they all need to get done before you start gluing things together.
1. Trim away the belt buckle area on the legs and upper torso bits.
The material folds over right there and we want to trim it down on both the legs and the upper torso (under the chest armour plate) so our abdominal armour plate lies flush against the body.
2. Build your abdominal armour plates.
This is nothing more than a square piece of plasticard with the bottom corners cut off at angles. Make it as wide as the chest armour already on the torso.
3. Clean the Imperial Eagle off the chest armour
This is easy enough to do with a hobby knife and a few quick strokes. These guys don't sport the eagle on their chest so we want to take it off.
4. Cut the gas mask canister off the head
We are going to be adding our own hose so we don't need the canister that comes on the gas mask. Carefully cut it away just behind the canister.
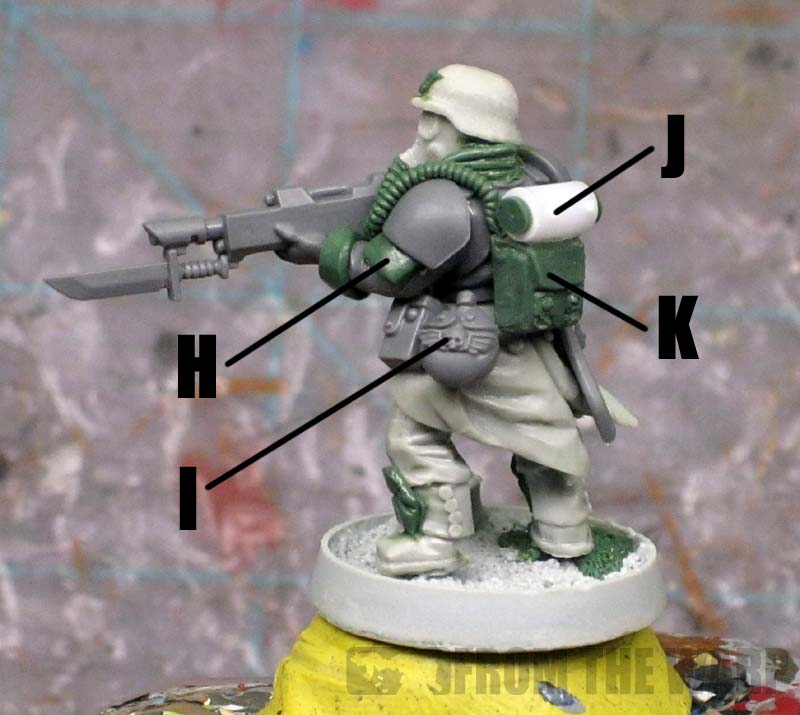
5. Build or buy your backpack
I made mine in this case (because I'm cheap). I used a Space Marine Scout pouch (or at least that's what I think it is). I cast up enough of them for the whole squad. On top of that, I glued a short length of plastic rod that I added little greenstuff caps to each end for some dimension. The last bit of detail was a set of rivets added with plasticard rod to give the piece some texture.
You could use anything for the backpack that resembles the gas mask canister they would need. The options are out there so it's just a matter of finding something that looks good to you.
Assembling the model
In order to make the process as quick as possible, it's best to do things in a certain order. You can do them in any order, but I've found this sequence to be the most pain free.
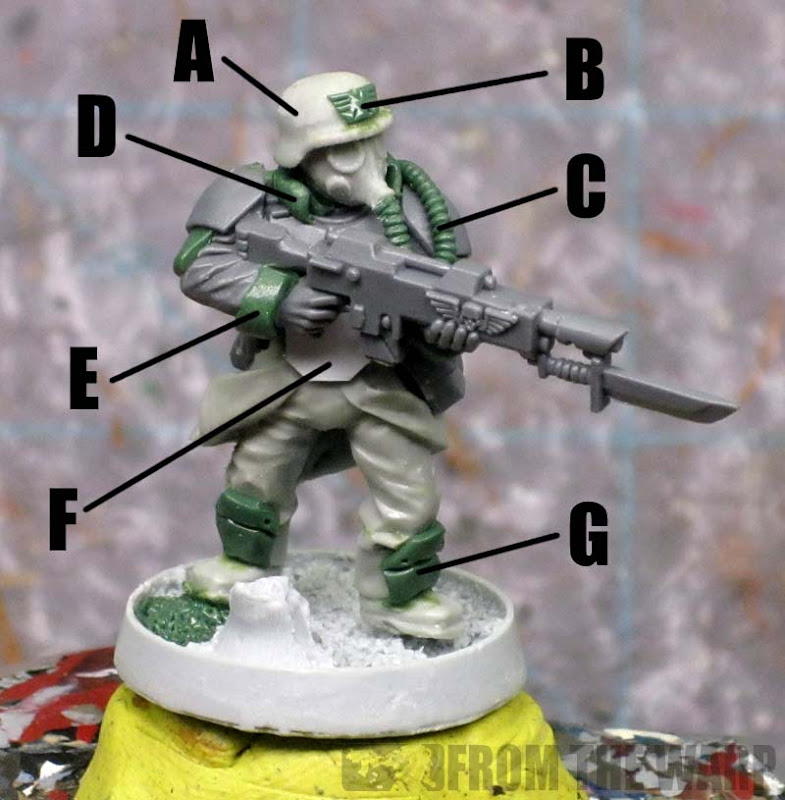
1. Add armour plates to lower legs. (G)
Sculpting these before you attach the legs to the base or begin working on the torso is essential for being able to get in there and sculpt. It's nothing more than a blob of greenstuff pressed into place and flattened out across the front of the leg. Go from the top of their foot to their knee or somewhere close.
Once you have it flattened out, trim away the sides into a somewhat rectangle shape. I added an indentation across the knee area to make it look like two armour pieces and then used the tip of my X-Acto blade to make two small indentations to represent rivets on each side.
Let these cure before going on.
2. Attach your legs to your base.
In this case, I'm using Blasted Wetlands bases from Secret Weapon minis for the completely destroyed battlefield look. I wanted the tree stumps and muddy field look for these guys. I pinned the legs in place and filled any gaps under their feet as needed for stability.
3. Add the upper torso and glue the abdominal armour plate in place. (F)
Figure out the pose you want your soldier to have and attach his upper torso in place along with his abdominal armour plate. Test fit first to make sure you've cleaned away enough of the surfaces so the armour plate lies flat on the model.
4. Attach both arms and then his head.
Once the torso is in place, you can add his arms and then his head in the correct positions.
5. Attach his backpack.
Depending on what you're using for the backpack, this may be as simple as gluing it in place or making whatever modifications are needed.
6. Sculpt arm armour (H) and sleeve cuffs (E).
These are deceptively simple to do. Both start out as blobs of greenstuff that are pressed into place and flattened out. The shoulder armour is made to look as though it is an extension of the shoulder armour and extends down slightly further. Trim it to the shape you like with your X-Acto blade.
The cuffs are done in a similar fashion and are a tiny roll of greenstuff that is pressed into place over his wrist and flattened out. Tuck the loose ends in between his arm and his torso so you don't see the connection. Flatten it out until you have the size cuff you want on your coat. All we're trying to do is bulk it out to look like the coat is folded back at the end of his sleeve.
7. Sculpt the high coat collar (D).
This is perhaps the toughest part since so many other things are already done. The reason we wait until this point though is because the collar can be hidden in some cases and you may not need to sculpt both sides of his collar.
Taking a tiny sausage of greenstuff, we add it to the existing collar to bulk it out. Using your sculpting tool, you can press what looks like folds into it so that it blends in with the existing clothes. You don't have to be exact here, just the suggestion of a high collar will work.
8. Add the gas mask hose (C).
The hose is created with the Tentacle Maker tool. Attaching it can be tricky at first, but once you get the hang of if, they go fast. The key is being delicate when handling the hose. You don't want to damage the fine surface detail on the hose.
Once I have a hose made, I add a tiny drop of superglue to the gas mask where we cut off the canister. I take one end of the tube and gently hold it up to the gas mask for a few seconds. It will bond quickly. Once it is secured, I carefully drape the gas mask hose over his shoulder and let it fall over his back. I cut off any excess leaving enough to tuck the end of the hose in behind his backpack somewhere. It doesn't have to be exact, we're just looking for a representation remember.
9. Sculpt the helmet Imperial Eagle (B).
Yet another sculpting bit that looks tough, but since we're going to use paint to help us describe the object, we only need to create the suggestion of the item. Pressing a blob of greenstuff onto his helmet, make sure you create a small area on the front that is fairly thin and flat.
From there, cut out a square shape for the overall size of the eagle emblem. After this, it's a series of indentions around the square to represent certain parts of the eagle. One indention in the top middle for the two heads. Two small indentions on the bottom for the tail and three indentions one each side for the wings.
10. Adding his equipment on his belt (I).
The last part is to look at your model and see where you have any free space along his waist that you can add your extra equipment. Each trooper carries a bayonet, canteen and extra magazine pouch. Depending on the pose and the space you have on his waist, you can cut the items apart and glue them in the free space you have.
And that's all there is to it. Ten steps to building this guy. I know it looks daunting, but it really is a simple conversion. Depending on what IG parts you may already have, this could certainly be a viable option to adding a very cool looking squad of Death Korps to your force.
Once I get the whole unit done and painted, I'll go over the painting process in depth as well.
Make sure to check out these posts as they might help:
Conversions live and die by the details
