Making wood themed bases is easy to do


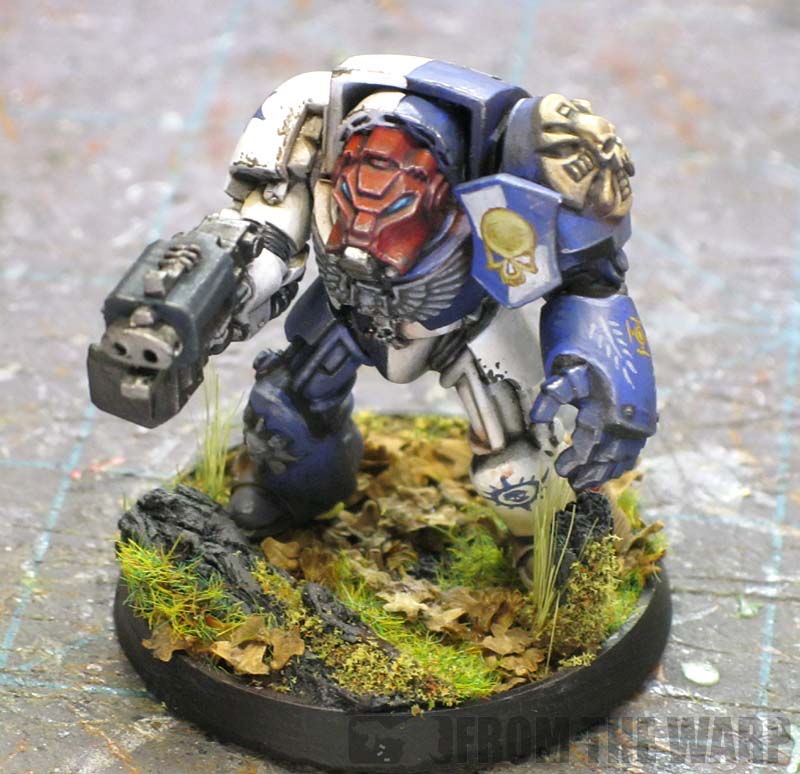
Making a woods themed base is much easier than I thought it was going to be. There are some things to consider when going with this theme, but I was surprised at just how quick it all came together. I'm going to show you how I made the one you see above.

What I used to create this base
GW Static grass (the bright green stuff)
Secret Weapon Minis Blasted Wetlands base
Material to represent the fallen, dead leaves
Material to represent moss and mold
Material for some taller bits of grass and such
White (PVA glue)
Material for tree stumps

I have a good bit of basing material from Secret Weapon Minis. I used a number of their products to build this base. While using their stuff makes it super easy (and I mean super easy) to do this, it would be wrong to list just them when you could do this with other materials as well... it may not be as easy, but there are options out there.

This post here talks extensively about using materials you find around your home.

Alternatives to buying the materials
The fallen, dead leaves: Secret Weapon Minis Fallen Leaves - Brown
Alternative: You can use brown construction paper and give it a variety of washes using browns and blacks to create a varied colored material. You'll want to do it on both sides of the paper though. From there, you can use your X-Acto knife to cut out a handful of leaves you can use.
I did this very thing for my first attempt at leaves on this base here.

The turf and taller grasses: Secret Weapon Minis Instant Scenery Kit Grasses
Alternative: These might be tough to replicate. You can shop around as there are a few companies out there making grasses and such. The trick is to get the color you like.

Dead tree stumps: Secret Weapon Minis Tree Stumps
Alternative: You can use small bits of shredded bark if you can get your hands on some. Take your X-Acto knife and cut one end flat for vertical stumps and break apart pieces until you get suitable sized ones for horizontal stumps.

Bases: Secret Weapon Minis Blasted Wetlands
Alternative: I will say that it's worth using the Secret Weapon Blasted Wetland bases for this though. They have the stumps already on them and it saves you a good bit of time. But... you only have tree stumps on there. Making your own might allow you to incorporate other elements like rock outcroppings and such.

You could do this with just about any base line really when I think about it. I went with the Blasted Wetlands for the "woods" look as opposed to the rock or overgrown ruins appearance.

Why woods bases can be hard to replicate
Woods can be tough to replicate because there is so much to woods that is not on the ground. Lots of times, our basing theme comes from what is on the ground. We don't show many elements that extend much higher than a foot or so in the model world. This is why woods and jungle can be harder to pull off than other basing themes like snow covered rocks. So much of what makes up "woods" is off the ground.

So we have to be spot on with the ground elements when we can't use what's around the model to help convey the atmosphere.


After looking at a few reference pics. I decided I would use a few key elements in my "woods" to create the feeling. I knew the tree stumps and fallen logs would play a big part in it. I wanted lots of dead leaves on the ground with patches of grass here and there. The last bit was some mold/fungus type growing on the dead trees.

The process
Once I had my base primed black, I gave the stumps a heavy drybrush of GW Stormvermin Fur and the ground a pass with Rhinox Hide. You could use any grey and dark brown really. Once those were dry, I started adding my vegetation.

The first thing to go down were the leaves. I covered most of the base with these as the ground in most forests is covered with them as well. On top of that in some places, I added the GW Static grass. I only added it to places I thought it would be damp enough for grass to start sprouting up and what looked good from a visual aspect (even if it was "wrong"). Places like right next to the log. That led me to the taller grass. It went in the low traffic areas and tucked into corners if you will.

When adding the material, I took my white glue(PVA) and mixed a little bit of Rhinox Hide paint directly into it so it matched the ground color and spread it around where I wanted the material to go. I went kinda heavy on the glue so I'd have enough to actually hold onto the larger material pieces. Sprinkle the material on top of the glue, shake loose the excess and move on to the next step.

With all of those pieces in place, I wanted to add some moss to the tree stumps to tie them to the ground. I also added this for a variety of textures. I thought if I could get a few in there, it might appear a bit more realistic.

I did go back and add a few more leaves in the end to get some more brown in there. You can see that not much of the original base is showing in the end.

What you need to know
This process goes quick. The base took me about 10 minutes to do (not including drying time). A whole squad could be done very quickly.

The biggest thing is doing this without your model in place. You need to do these separate from your models. Since you end up with so much material glued to the top of the base, it's important that you pin your model to the base as well for a solid connection. Simply gluing your model onto the leaves will not provide you with the support you need for gaming.

As far as varnish, I suspect you could get away with varnishing your models after you have attached them to your completed woods base. I'd be more inclined to varnish them before attaching them though just to be safe.

Make sure to check out these posts as they might help:
Basing your models with free stuff from around your home
How to make static grass stand upright


Ron, From the WarpIf you've got any questions about something in this post, shoot me a comment and I'll be glad to answer. Make sure to share your hobby tips and thoughts in the comments below!

27 comments:

  1. Nice wood themed base :)
    Nice article :)

    ReplyDelete
  2. I like it. It is a unique theme for the base. You just don't see woodlands done that often.

    ReplyDelete
  3. Thanks Ron that's a great help for my jungle fighter tau+kroot:-).
    I've got some old plastic aquarium plants I might butcher to bring the jungle element into the base too, thank you for showing how to get the majority of the base down. Great work as usual.

    ReplyDelete
  4. Thanks guys!

    Feldmarshal G: You're right, you don't see them much at all.

    Ginger Kid: You're welcome!

    ReplyDelete
  5. Amazing. I was going to paint a tactical squad but now I have to paint my terminators that are going on bases like this, just because of this article.

    I think I'll paint the bases first, in fact ;)

    ReplyDelete
  6. wow soo handy! never thought of using construction paper for leaves!! nnice tip man!

    ReplyDelete
  7. Good to be able to get back on here after a couple of months away and see this! I love these bases!

    Great tips as always.

    Like you mentioned, I found that Dry-brushing goes a long way on bark. For the inner portions of a log or splintered wood, using a very fine brush to add some faint streaks (for longitudinal breaks) or rings (for cross-sectional breaks) can help as well.

    ReplyDelete
  8. You can also put those leaves in a small box lit and spritz with red and yellow primers to make "autumn" looking leaves as well.

    ReplyDelete
  9. I think I'll use this theme for my up-and-coming Eldar army! I'll probably put in some streams too for added realness. The part I'm most worried about is painting the logs. Is it really that simple to make them look that good? A drybrush of grey over black priming? I can't believe its that simple, is that really it?

    Thanks!

    ReplyDelete
  10. Michael Ovsenik: Yes, you need to do the bases separate from the models to get the best effect.

    dancing platypuss: The toughest part is getting the right shape to the leaves. I'd say it would work for a one-off model, but for a squad or army, you'd be far better off buying them.

    Ijanus Enitorus: Good point. Adding faux texture always helps make a bit look convincing.

    Man Boy Genius: Excellent point! That might get you even better looking leaves in the end.

    Anon: Yes. If you want to get fancy, you can highlight the bark by going over just the top edge of the tree with a slightly lighter shade of grey for effect.

    ReplyDelete
  11. That moss looks amazing, what did you use? Is it a mix of flock colours?

    ReplyDelete
  12. Anon: I'm sure it is a mix of colors... it looks that way up close at least. The fine turf (moss material) comes from the Secret Weapon Grass kit.

    ReplyDelete
  13. The best way I've found to make moss is to use the fine turf material mixed with PVA (white glue) -- you can also use blister foam by putting cyanoacrylate (Super Glue) on the base, press the foam into it, and let it cure. Pull the foam away and VOILA! instant moss. But it's not as good.

    The alternative to the field grass in our kits -- old paint brushes.

    Bias for the Secret Weapon products aside -- even though they ARE super awesome! -- while I have a lot of natural, cheap alternatives in my kit I've never been as happy with the results. If I were I'd just put those products into a kit too!

    ReplyDelete
  14. One thing that would give even more "life" to those bases is using lichen and painting them dark brown so they look like fallen branches.

    ReplyDelete
  15. The best thing to use for leaves is birch tree seedpods, saw a guide ages ago (on my phone so can't find it now) but you just gently tease it apart and tiny "leaves" flake off which can be baked in an oven then used as leaves. I don't know for sure but it looks like that could be where the secret weapon leaves come from. Another tip is to use small amounts of water effects, optionally with brown ink added to represent muddy buggy areas also if you shred a coloured sponge (a cheese grater works) you get flock that can be used as flowers, won't suit everyone but works great for wood elves

    ReplyDelete
  16. You can call me Andy: Very true. I think the biggest thing you can do is find some reference pictures, figure out what materials you're going to use and get yourself a plan. Trying to do this on the fly or as you go along may cause more problems.

    The addition of dead sticks and branches and such would make for a great addition. The key is figuring out what elements you need to convey the feeling you want in the end.

    Skoby: I've heard that too. That's a good bit of work it sounds like when the alternatives out there are tempting and so much easier.

    ReplyDelete
  17. @Skoby: Yup, the leaves that Ron is using ARE birch pods. All of our fallen leaves are made from sterilized birch pods.

    ReplyDelete
  18. Very nice job. I used the Iron Halo resin bases (which ARE very nice, don't get me wrong) for my wood elves - but scratch building bases is always so much more satisfactory, as well as often cheaper.

    ReplyDelete
  19. Philfy: Thanks. Very true, making your own does give you much more satisfaction. I'm not against using a nice resin base as a foundation though. Sometimes adding elements to those can take them to a higher level.

    ReplyDelete
  20. I've used crushed, dried bay leaves for autumn leaf litter and I thought that worked pretty well. Just be careful if you raid your spice rack not use anything that will be expensive to replace!

    ReplyDelete
  21. Alex: I don't know about that. My Wife lets me get away with lots of things in the name of the "hobby."

    I'm afraid that might be a bit too much for even her understanding.

    ReplyDelete
  22. Most train and historic modelers have their own secret herb blend -- I've used my two favorites for our Dark and Light leaf litter. Herbs, and tea, are great for forest blends. The do tend to be more expensive if you're raiding your cabinet instead of buying a ready forest mix though. The benefit of buying 50# of thyme at a go ;)

    ReplyDelete
  23. I got away with it since it was for a one-off project. My wife would not tolerate me mowing down her herb garden to base up an entire army!

    And on that note, I'll probably need to order some of Secrete Weapon's leaf litter mix.

    ReplyDelete
  24. Yeah, I went to make a new display base and used about $20 in herbs to make it happen -- half of five different jars. After that I decided it was time to release my mixes as commercial products so I had an excuse to order in major bulk... and now I restock the kitchen thyme from the Secret Weapon stock. True story :)

    ReplyDelete
  25. Restock the kitchen from mine... very funny. Leaves the Wife little room to complain about the hobby then.

    ReplyDelete
  26. inspired me to do my entire raven guard army on woodland bases, im even experimenting with adding water pools. top article!

    ReplyDelete
  27. Adam: Excellent! Please send me some pics once you get a squad of them done. I'd love to see how they turn out.

    ReplyDelete

If you've got a relevant tip, trick or link, make sure to include it in your comment for the rest of us to check out!

Note: Only a member of this blog may post a comment.