How to paint rich skin tones and their effect

40k Deathwing Terminator Sergeant

I got a reader question the other day about painting rich colored skin tones. The best example I can think of it in my recent work has been my Deathwing Terminator Sergeant model. The skin is super saturated and rich in color.

So how did I get the skin tones like that?
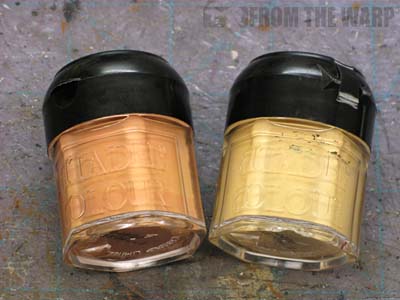
To get this particular skin tone, I started with a light grey primer. This made it so my lighter colors weren't darkened down and it saved me from having to apply multiple coats to get good solid coverage. The light grey color is the perfect answer for me.

I think the base color really sets up the "feel" of the skin in the end. Here I used GW Dwarf Flesh as my basecoat. As skin tones go, it's fairly dark, but it's a vibrant color. Over that goes two passes with GW wash Ogryn Flesh. This also darkens it down some more. The last bit of shading I do is in the deepest recesses only like the eye sockets and around the neck joint and it's done with GW wash Devlan Mud. Once this is completely dry, this is where I start to build the highlights up from.

The next step is adding some of the original base color back in as highlights. I pick out some of the more prominent edges and surfaces to bring back up to the original base color. Places like the cheeckbones, nose and forehead.

The second and final highlight is done with another vibrant color, GW Elf Flesh. I thin it slightly and hit only the very upper portions of the face. The bridge of the nose, the top edge of the forehead and maybe a spot on the cheekbones. I don't go over every previous highlight again, I just pick out the upper portions for effect.


The reason I don't add white to the base color is because I don't want it to wash out. I'd rather use another lighter, rich color instead to keep the life in there. It also adds some variety to the skin tone overall and I don't just have different values of one color.

To finish off the whole thing, you can go the extra distance and paint on facial stubble or a shaved head look where appropriate.

Why painting skin muted or vibrant matters
While it might not seem that important, the look you give your skin tones will affect the overall look and feel of your army. By that, I mean painting your pale Dark Eldar models to look as though they've just come from a week long vacation at the beach doesn't convey that unhealthy, sick look to them. In this case, a more muted, pale look might be more effective in conveying that feeling to your models.

Want to make your Imperial Guard unit look fresh from their home planet? Give them nice, warm skin tones, clean uniforms and no battle damage. Everyone who looks at them will think they are fresh from recruit school. Give them pale skin tones, a little bit of weathering and next thing you know, you have a battle hardened squad that hasn't had a break from fighting in months.

Take a look at my Deathwing Sergeant vs my Black Dragon marine:


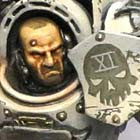
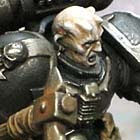
One of them looks like he is well fed and healthy. He looks vibrant and full of life. He might be a bit rugged and worn around the edges like any good guy should, but he looks alive. The other guy does not. He doesn't look quite as healthy and maybe even like something is wrong with him.

To add another aspect to my Deathwing model, the skin is saturated, but the armour is not. It gives him (the man inside the machine) a very real and life-like look where the armour looks lifeless and just mechanical. It also helps draw the focus to his face.

Skin tones might be a small part of the whole picture, but definitely matter
How you paint your skin tones is only a small part of the overall look you give your army. Other things will help reinforce the feeling you're going for or work against you. The trick is matching things up to point your viewers in the direction you want them to go.

You can get this saturated look with other colors as well. Just make sure they are rich, you don't wash them out by adding black, white or a complimentary color and try using a few different colors instead of multiple values of a single color. It can get way more complicated than this when it comes to painting skin tones, but this should get you started with a good tabletop result.

Make sure to check out these posts as they might help:
Painting shaved heads and facial stubble
Painting Raven Guard pale skin tones
Painting Dark Eldar skin tones


Ron, From the WarpIf you've got any questions about something in this post, shoot me a comment and I'll be glad to answer. Make sure to share your hobby tips and thoughts in the comments below!

22 comments:

  1. Very inspiring How-to.

    Oh, and the deathwing dude´s head painting is impressive.

    ReplyDelete
  2. Great tutorial. Thanks Ron. Going in another direction, how would you do a really sick skin tone, like a Servitor? I'm thinking a variation on your Dark Eldar method.

    ReplyDelete
  3. Thanks for the how-to, I'm currently working on improving painting faces with my current space wolves and I've been having trouble trying to figure out how to make the features really pop out on the face. I think I might just grab some leftover head bits and practice some more!

    ReplyDelete
  4. I am trying this tonight on my white scars librarian I hope to be able to pull off a similar effect.

    Great explanation of process, can't wait to try it out.

    ReplyDelete
  5. I recently tried my hand at painting different types of skin to add story to a character & the unfortunates on his scenic base:

    The lead guy is a dark elf (anointed of khaine) so I tried to keep his skin tone dull (there wasn't much as the person I was painting this for wanted him to be wearing a body suit). I used black wash on him which really dirties up the tone.

    The base was covered with high elves, the only one still alive was given a richer skin tone, funny enough using similar stages you've noted!!

    The dead chaps used a more pallid skin tone and given less highlighting, I used some purple wash early on to try and convey a more bruised... lifeless look to them.

    You can see my attempts HERE.

    Comments and feedback are always welcome!!!

    ReplyDelete
  6. Thanks for posting this Ron. I've had a head on 'standby' waiting for this post. Hopefully will have it painted by next week.

    ReplyDelete
  7. Very nice .. the face looks very realistic. He kind of reminds me of Jason Statham 8)

    ReplyDelete
  8. This is a very good look into your technique. Your artistic ability really shines with your decision making and color choices!

    The post has definitely enlightened me as how to better present different aspects of my models.

    ReplyDelete
  9. WOW That deathwing head is awe-inspiring! you should enter him in a GD! you are 1 amazing painter!

    -fuzz

    ReplyDelete
  10. I for one LOVED the raven gaurd skin tone you did. I used a similar tone on the dark eldar I'm currently working on. So simple but so effective!

    Zab

    ReplyDelete
  11. Cheers Ron. I'm there painting away, start getting to the faces and have a crack. Think to myself, 'oh they're actually looking pretty good, especially for me' and then this comes up. Mine now look terrible haha. Awesome post as always man! I've also put pics up of my camo cloaks at last=]

    ReplyDelete
  12. Another great article, and yet another reason FTW is my go-to site for hobby research/advice. Your efforts are much appreciated, keep it up!

    ReplyDelete
  13. I second SAJ!!! always be assured of top quality stuff here on FTW!

    ReplyDelete
  14. Fantastic Article I was just looking for something like this the other day. Your timing is great Ron!!

    ReplyDelete
  15. Thanks for all the replies folks AND the kind words.

    As for trying this with some sickly looking skin, I'll have to see what I can do, I've done pale skin before... but nothing ill looking.

    Overall, the trick for me has been picking similar (healthy tones in this case) colors, thinning them slightly (while working over a light colored primer so they don't lose too much of the vibrancy) and working on picking out those details on the face.

    I'm just glad so many folks got something from this little comparison so to say.

    ReplyDelete
  16. Amazing Ron!! I love it.

    May I ask where did you get that head bit from? (the deathwing terminator sergeant of course). Is it from a sprue, is it scratch built...? I'd love to use it on my own creations!

    Thank you!

    ReplyDelete
  17. Rafael: It's a standard GW bit. I made no changes to it other than when I painted it trying to pick out certain facial features for emphasis.

    It's from the regular terminator boxed set.

    ReplyDelete
  18. I will certainly be using this method in the near future!

    ReplyDelete
  19. excellent!!
    I will try this scheme for sure!!!

    ReplyDelete
  20. Another great how-to post. Please keep them coming!

    ReplyDelete

If you've got a relevant tip, trick or link, make sure to include it in your comment for the rest of us to check out!

Note: Only a member of this blog may post a comment.