
With Forge World releasing their new resin Minotaur shoulderpads and getting an email from a reader about painting Minotaurs, I thought I might see how hard it would be to paint the new "bronze" color scheme Forge World has them wearing now.
The best part of this whole thing is I found the perfect use for my pot of Tin Bitz that has been lying around for ages.
The actual painting process is fairly quick
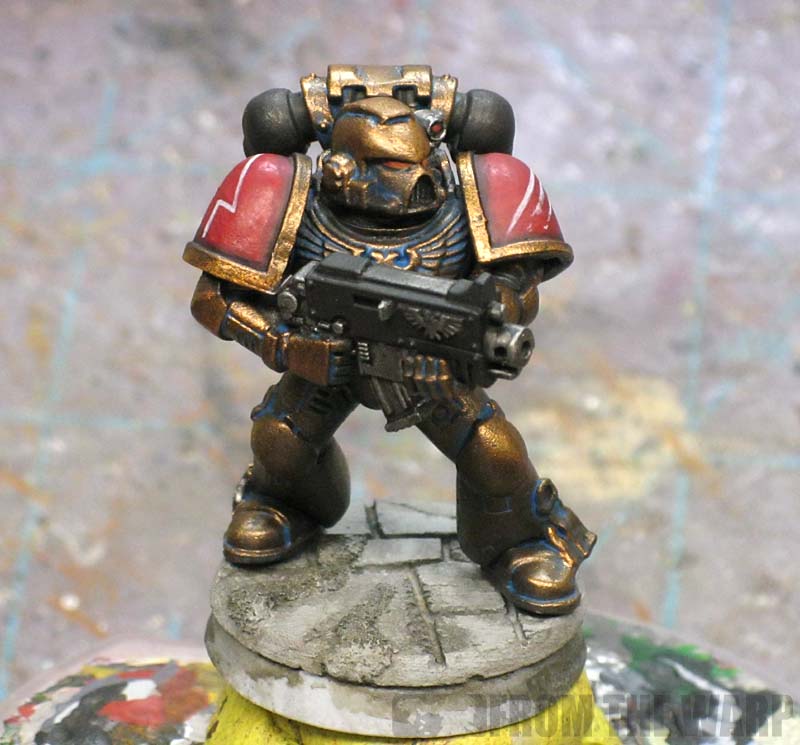
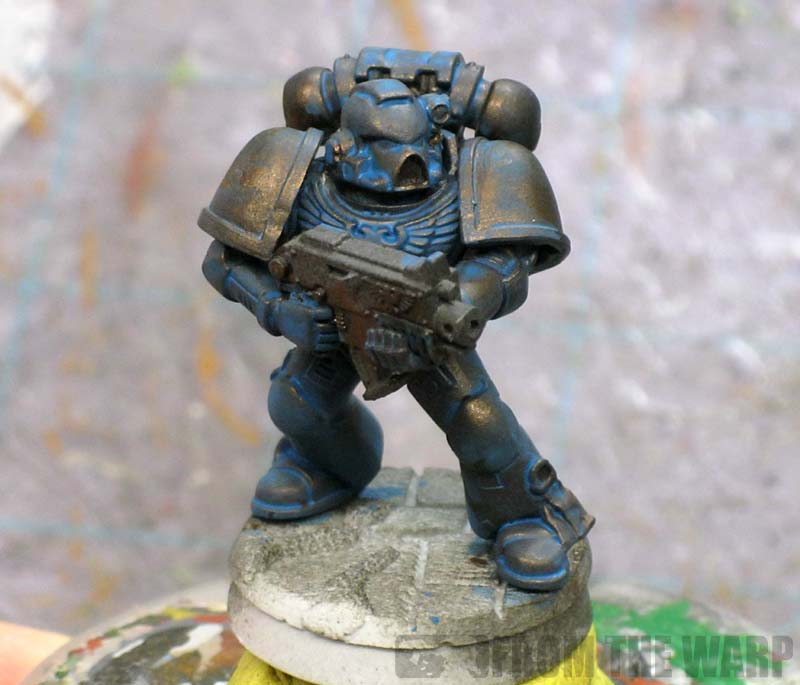
Once you have your guy assembled, it's a quick prime of black followed by a good basecoat of GW Tin Bitz. You don't have to worry about where you get it either, just slap the stuff on.

Once that dries, it's a liberal wash of slightly thinned GW Hawk Turquoise over the whole model. Again, no need to worry about where it goes. Just make sure you cover the whole model (Step 1). Make sure that has time to dry completely before moving onto steps two and three. Once your Hawk Turquoise wash is completely dry, take your Tin Bitz and give the model a good drybrush of the basecolor again (Step 2).
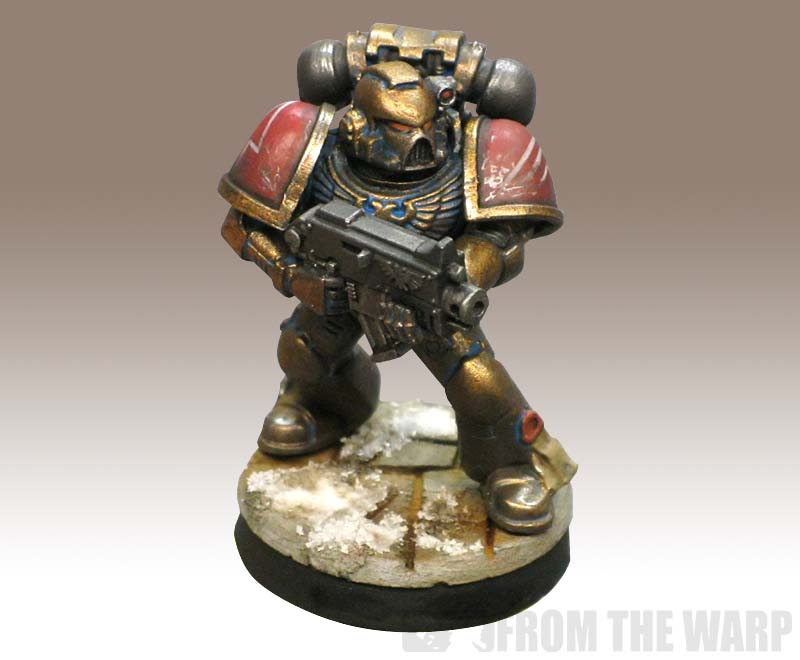
They key with this step is to make sure your larger armour plates get good coverage. After your done with that, it's a matter of one more drybrush of Folk Art Metallic Solid Bronze (step 3). I think this is close to GW Dwarf Bronze if memory serves me correct.
Apply this final lighter bronze color to the upper portions of the model only where the light would hit the surfaces. This is in effect our highlighting on the model. It also gives the model a warmer look than just having the Tin Bitz on there.
And that's it for the amrour. Simple as that.
The rest of it is a matter of finishing off the details on the model.
The details bring it to life
I will add that it's worth going in and adding some shadows to the deeper recessed areas on the model. This helps with defining the armour plates and removing a tiny amount of the patina effect so it's not too overpowering. We go heavy with the effect in the beginning so we can remove it as we want. It's easier than trying to build it up at this point.

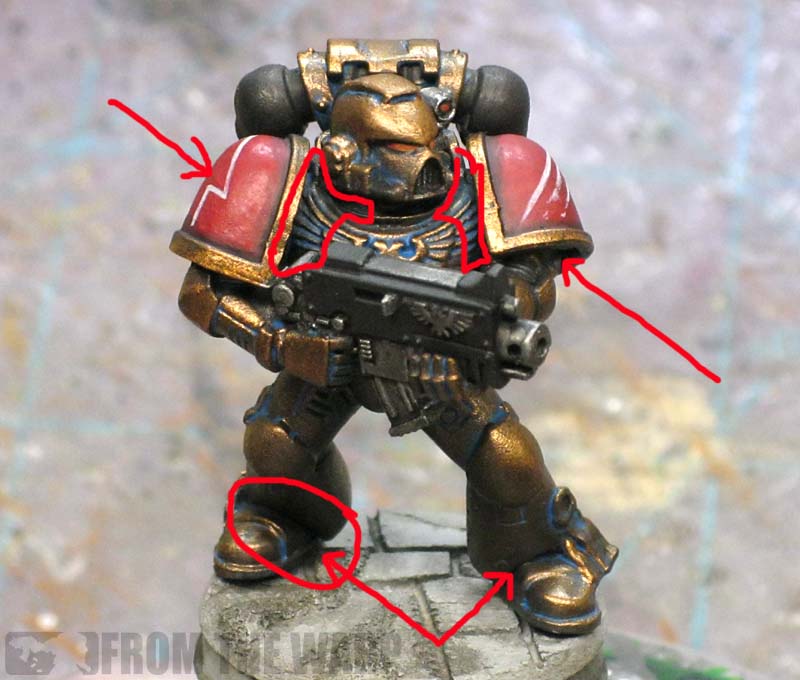
In this picture, you can see where I took and applied a quick wash of GW Badab Black. It's only in the deepest recesses so it helps with the overall shape of the model.
When it came to heraldry, I had to sort of make it up since I don't have the latest Imperial Armour book yet. I chose the red shoulderpads as a way to break up the huge amount of bronze on the model. I don't know the significance of the red, but it comes from IA10 so it must be good right?
The red started out as GW Foundation Mechrite Red with a thin layer of GW Red Gore and a wash of Baal Red to darken it down. I didn't want it to pop out on the model and compete with the gold so I kept it really dark. Badab Black carefully applied around the trim really made it darken down considerably.

I'm guessing he's got a tactical Squad arrow outline on his right shoulder and some kind of Veteran status markings on his left. Both are easy enough to do, the only thing you have to be careful of is working over the completed (highlighted and shaded) shoulderpad... any mistakes and you'll be stuck painting the whole thing over again. Freehand shouldn't scare you away if you know what to watch for when doing it.
The trick was to lightly draw the markings with a pencil and then go over that with the paint. The pencil is just dark enough to see, but comes off easily enough with a damp Q-Tip when done.
Some additional weathering
I did go through and apply a few powders to some key spots and used a pencil to add some wear and tear along the more prominent edges of some armour plates. The pencil is a great effect and quick too. The powders I used in this case were Exhaust Black (around the lower portion of the shoulderpads) and Metallic Iron (on the backpack and boltgun). Both are from Secret Weapon Minis.
The pencil weathering technique is explained more in this post here.
The base and slushy snow effect
The base also comes from Secret Weapon Minis and I decided to try making what I thought would pass for slushy snow. Actually, there's moss molded onto the base and I could not find my moss material to save my life. These are the same bases the Storm Wardens team used and I've always loved how they look.
The snow itself comes from Gale Force Nine. All I did was apply some white (PVA) glue to the base and sprinkle the stuff on. After is was dry, I went in with a slightly diluted GW Devlan Mud wash and dabbed it onto the snow in a few places to make it look like it's picked up some of the dirt from underneath it.
There are lots of ways to do snow, here are a few more here.
And last but not least, the banner

Just click and save it to your desktop. Print it out from there to the size you want.
All in all, this guy came out better than I thought he might. I was worried at first about getting the right amount of patina on the armour, but it came out okay in the end.
I'm still partial to their old school look, but the new bronze doesn't look too bad either.
Make sure to check out these posts as they might help:
Adding freehand, the pros and cons of when to do it
Basing with snow, a few methods to get the look you want
Another look at painting metallics
A few more unposted/WIP model shots


The miniature comes fine.
ReplyDeleteI like it...great details.
ReplyDeleteThanks guys!
ReplyDeleteHrmm, the early steps will work great for some bronze statues I am doing for terrain, thanks Ron!
ReplyDeleteLooks really well, going to use this bronze technique on my vampire counts skelly armour bits
ReplyDeleteI like them! The paintjob is simple, but very effective. The addition of the subtle weathing on the shoulder pads gives them just the right feel. As always, well done Ron.
ReplyDeleteThe patina weathering works really well to give the model more interest. I find it works great on largely metallic painted models.
ReplyDeleteI've used both Hawk Torquise for this, and more recently also tried snot green. See here:
http://ipaintmodels.blogspot.com/2011/12/heroes-are-born.html#more
I'm not sure if one colour is more associated with a particular type of metal... but I always rear the torquise as a weathering of bronze, whilst the snot as a weathering of copper???
The one thing I'm yet to try, but eager to have a go at, is combining the two colours in successive layers to give a greater and more realistic colour variation.
Have you ever tried that to see how it works?
Good but bronze also has a hint of green, try tossing in a touch of really watered down (thinner/water) DA green, if done right the pigments breaks down enough to leave both light and dark green as well as some touches of white. Really creates a good effect.
ReplyDeleteLove the bronze....not too bright like gold, which is the reason i don't like San. Guard
ReplyDeleteStill waiting for White (Scars?) tutorial...(weep) when it's available.
Thanks guys!
ReplyDeleteAridMonk: Absolutely, this would work perfectly for that.
oink: I haven't tried mixing colors to get any type of variation to the patina effect, but it might be worth doing. since this was more of a rank and file model, I actually didn't even think of doing that.
Anon: It's almost done. I just have to add another couple pictures for comparison and it will go up. Maybe in the next week or so.
Looks good and the method has less steps than mine. I think that you should add some dark green to your wash. Here's my method for aged metal: http://dedard.blogspot.com/2010/12/how-to-painting-tarnished-metal.html
ReplyDeleteSimply amazing.
ReplyDeleteAnother tutorial to add to the bookmarks of "future projects"!
Harrower, that statue looks great! It's interesting to see the same effect (albeit achieved slightly differently) done on models of different scales.
ReplyDeleteThis is a great tutorial for anyone who is trying to do statues or buildings also! Thanks so much Ron!
ReplyDeleteThe Harrower: I like the Shining Gold at the end. That and the mix of Gren and Turquoise gives a slightly better color I think. Nice work.
ReplyDeleteKevin and Fayte: Glad you like it guys!
That's incredibly fast and well done. This really makes me want to start a Minotaur army.
ReplyDeleteI like it, I used brazen brass over tin bitz with a wash of jade green see it here
ReplyDeletehttp://aureliuslegion.blogspot.com/2011/11/badab-war-minotaurs-finished.html
What I did want to know is how close the colour is in the picture to the actual mini?? as it looks like a golden colour in the picture which I do like.
oni: Speed was one of the big factors in this guy.
ReplyDeleteVitor: Thanks, it's spot on in this case. Sometimes the photo alters the colors slightly... but on my monitor, the mini and the pic are the same.
Your monitor may be different though.
I like this!
ReplyDeletealthough bolter casing should be red also :)
I would like to see you do one properly (not speed painted)
Be good.
Cheers!
Love it! Makes me want to start a small minotaurs detachment! Thx ron :)
ReplyDeleteAnon: Thanks, I've got another Minotaurs post going up soon with step by step on how to paint their iconography.
ReplyDeleteLooking forward to that! My first Minotaur Rhino is in Progress! Just wondering if the Bronze you use is really close to GW Dwarf bronze! Looks a little bit Dark to me! :/ Maybe a light Brush with GW Shining gold?
ReplyDeleteChris: I don;t know to be honest. I used Tin Bitz as the base and a "brand-x" bronze color. It was Metallic Solid Bronze by Folk Art if that matters.
ReplyDeleteI checked out shining gold for the last highlight brush! ;) Works pretty well for me! Folk Art Stuff is unfortunately hard to get here in Austria but thx for the reply!
ReplyDeleteChris: And Shining Gold should work just as well. In the end, it doesn't matter the exact colors you use. Different colors will produce slightly different variations in the final result, but it becomes a matter of personal taste.
ReplyDeleteRon: Have you found a good replacement for tin bitz? I am about to undertake repainting all my mah-rines to minotaurs and I want a uniform... the new ver from GW looks too dark...
ReplyDeleteStad: That's a good question. I have not yet. The new paint line has a few "bronzes" out there, but I have adopted the P3 metallics after hearing bad things about the new line of GW metals.
ReplyDeleteGreat guide.
ReplyDeletehere is our take on painting minotaurs
http://www.tartanpaint.info/2012/07/20/minotaurs-space-marine-painting-guide/
Tartan Paint Studios: Very nice work and thanks for sharing the link!
ReplyDeleteThis is an excellent guide, Ron, many thanks. I tried it out on an old Captain model and I'm blown away by how great the result is for surprisingly little blood and sweat. I'm pretty certain I've become a better painter thanks to it.
ReplyDeleteThe joy's tinged with trepidation, though, as now that I've got the captain done I want to stick an army behind him... But at least I know what I'm doing!
Union Jackal: It's not too bad is it? It wouldn't be too hard to put together a force suing this approach. And you could always improve on it as well.
ReplyDeleteGreat and simple technique. Quick query though, has tin bitz gotten lighter over the years as my mini came out far darker (I'm using an old screw top pot)? Also using dwarf bronze didn't hive mine the lovely golden highlights yours has. I fixed this with a very light drybrush of burnished gold if anyone was having the same problem.
ReplyDelete