
Necron Scarab swarms have always fallen short of impressing me. They just don't look like a proper swarm with only three or four models on a 40mm base. I decided to fix that and make my own swarm... one that looked the way a swarm should look.

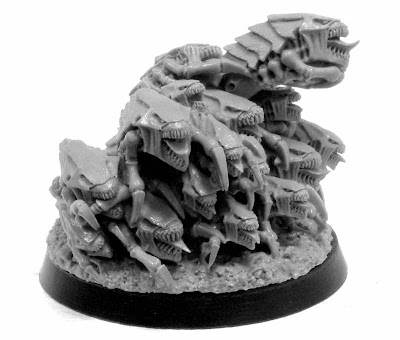
Image from Forge World
I took my inspiration from Forge World's Tyranid Ripper Swarm. Now that's how it should look. That model looks like you are about a half second from being completely overrun and crushed to death under a wave of tiny creatures. That's the effect I wanted.
Building the swarm
The first thing I needed was more Scarabs. I had a bunch of them from an old box of Necron Warriors I picked up years ago, but I couldn't use them all to build one base. And a unit of these things has 3 to 10 bases. By my math (wanting to put at least 10 on one base), that's anywhere between 30 to 100 scarabs. And that's a lot of money. Enter casting.
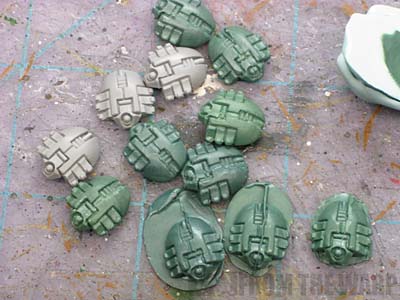
I decided I would try to cast up a single Scarab and at least get it close enough that I could use it to build a wall of them on the bases. It wouldn't have to be perfect since I'd add three or four good ones on top of the pile that had all the details on them. I just needed filler for the bottom of the pile.
I kept my greenstuff heavy on the blue (about 60/40) so I'd have some stability to the model overall and I could speed up the process of casting. I used the Blu-Stuff I'd used the other week with casting my shoulderpads.
I let each one sit in the mold for two hours before popping it out and making a new one. That was just long enough for the greenstuff to set so that I didn't damage the scarab when I popped it out. I could have given any Tomb Spider a run for its money. But you can figure out how long it takes to make a single base then. That was a reality check for me.
It's a good bit of work to do all this, but if you're committed to using these guys in your Necron army and you want a certain "feel" to your models, it's probably worth the time if for nothing else than the look on your opponent's face when you set them down on the table.

Assembling the swarm
Once I had a handful of Scarabs, I set about creating my wave of destruction. I started with a wide base of them and built it up so that I had only three or so on the very top of the wave (the good models). Between each layer, I added little blobs of greenstuff so that I could give the individual scarabs the look of crawling or scampering along the ground and each other.
This helped me give the wave some height and allowed me to position them at slightly different angles. In some places, I cut them in half (front and back) and used the two separate pieces to fill in on the underside as needed. It helps bulk out the bottom of the base where I didn't need a whole scarab, but just the front end or back end of one sticking out.

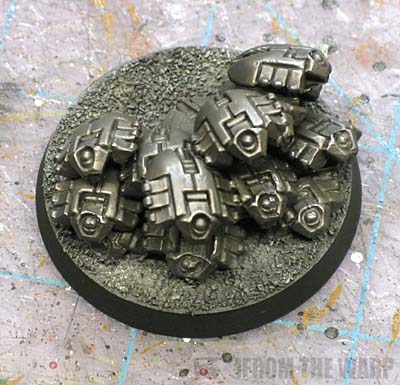
And here's the completed assembly. You can see the few good ones are resting on top of all the cast ones. In total, there are 13 scarabs on the base. Ten casts and three actual models.

Here's the painted model again. I gave it a quick prime of black, a basecoat of GW Boltgun Metal followed by a wash of Badab Black and Devlan Mud. I drybrushed some metallic weathering powder across them real quick and then hit the more prominent edges with a pencil.
In terms of scale, I like their height. Not too tall, but tall enough to appear as though they could cause some real problems as they swept over things.

If I were to do it again, I'd definitely look at how I mold them so I wouldn't have to deal with a mold line running down their backs. That's just inexperience on my part. I think I'd add a few more to the base as well so it seemed more like a carpet of them. Even then, this is still a big step towards creating that scurrying wall of metallic bugs look.
I can't help but to make scuttling noises every time I pick these guys up.
UPDATE: My second Necron scarab swarm base is now posted.
Make sure to check out these posts as they might help:
Another way to paint metallic silver
Guest Post: Airbrushing Necrons

very nice! I also did this for my Necrons back when I planned to field 30 of them although I went for silicone rubber and resin which speeded up things significantly.
ReplyDeleteReally nice work, amazing! :O
ReplyDeleteYoure an trully artist...
Greetings from Spain.
I did something similar last year:
ReplyDeletehttp://twin-linked-awesome.blogspot.com/2010/04/necron-update.html
The whole 3 floaty scarabs to a base always bothered me since they're supposed to represent a swarm.
Great work on the casting Ron. Look much better with lots of them on the base. If I had to make a criticism it'd be that they're a bit flat in colour. The little "eye" on the front would look good in a glowing green.
ReplyDeleteOtherwise the metal looks incredibly realistic. Good job.
I second the glowing eye for the front. And maybe done of that osl you do so well. Really make it pop.
ReplyDeleteVery nice Ron - great idea and well thought out!
ReplyDeleteJust a question on the whole moulding process you did - did the mould line run along the back of the scarab or across it?
Was also wondering about getting enough pressure on the push moulds to make sure the green stuff formed properly....
This comment has been removed by a blog administrator.
ReplyDeleteProtip: Green stuff moulds are a very grey in legality, if you do it for a full model like a Scarab, it becomes even darker, something about Fair Use apparently, though I'm not sure about the finer details of in the United States of Americnasha
ReplyDeleteI like the idea, but I'm not sure how well it works. The Rippers have tails and that's what makes them look good imo, it gives them a sense of motion. The scarabs just look like they are simply piled up. The tails also use up space. With all of the scarabs at the front and nothing in the back, I find myself asking, "where is the rest of the swarm?"
ReplyDeleteAlso, no fault of yours though, the rippers have a lot more detail to the models. They have reaching claws and gaping jaws. The scarabs just don't look as hungry as they should.
I think this is a fantastic idea that you can take up to the next level. I propose adding claws or pincers to the front of the scarabs and a tail or a contrail on the back. I think that would make them look much better, but would require a lot of work.
And add OSL like someone else commented- it usually looks great!
you should have them nom noming on a SM or a tank door :D
ReplyDeleteI am so going to steal this idea! I really like the true swarm approach, really fits with the feel and artwork of this unit.
ReplyDeleteI was originally going to bunch the scarabs of 6 swarms together, but this method combined with 1-2 home-sculpted smaller size scarabs & greenstuff molding is going to be the way I'll tackle these mechanical blighters!
Thanks for sharing this one Ron, extremely helpful!
I knew someone would do this. It's too cool of an idea not to. I hope FW makes something similar.
ReplyDeleteAnyway... Your build looks amazing. The paint job needs a little more character, but overall I'm very impressed.
Thanks guys!
ReplyDeleteFromTheFang: I think I went a bit heavy on my highlighting and covered up most of my shading. I see what you mean.
I opted out of the OSL for the eyes after I realized my mold line ran across the eye and it was difficult to get it perfectly cleaned off. It probably would help the whole look of the model though.
Lloyd: On the actual model, the mold line runs around the outer edge. I made it come over his spine since I was still experimenting with how to get a good mold made.
As for pressing the GS in, it's very easy and only requires a firm push to get it into all the tiny areas. It's not much really.
Anonymous: The idea behind making more scarabs was to create an effect with the model. I'm not looking to duplicate them and sell them for profit. I'm only interested in creating a mood for the figure by adding more of them to simulate the "carpet" look. I can see what you mean though.
Reid: If I were to do it again, I'd certainly make more and create the carpet look instead of a pile of them. That's just going to take longer to do, but probably better looking in the end.
Hephesto: Sure, like I said this is not to teach people how to duplicate them for profit, only to show that you can use the process to make a few more in order to create a certain feel to the model.
oni: Yep, I wanted to try this forever. The paint job is really just to see how the conversion looks all covered up in the end. The conversion is where all the work is on this model. The painting was secondary really for me as I just wanted to see if I could even do the conversion.
Thanks Ron!
ReplyDeleteI've got the blue stuff however my initial tests weren't very good, mainly because I didn't really try!
Will have to bite the bullet and just get involved I think and try it for myself - will be having a sculpting session tonight taking tips from Lamenter who does the blue stuff and has some great tutorials on his site!
Lloyd: It really is a matter of experimenting. Try something small so you don't grind through your Blu-Stuff too quickly, but it took me a few tries until I found something workable.
ReplyDeleteIf I were to do it again, I'd cut the mold differently so I had my mold line in a less obvious place. That and I'd make more so I had a carpet instead of a wall of scarabs.
Lessons learned in this case, but they are something I can apply to my next project.
Great idea! Love the look of them.
ReplyDeleteThanks for the post. While my scarabs are based differently (trash and skull piles) this does inspire some ideas for "swarming" them.
thanks.
I will mantain my statement that necron scarabs are descendants of the cybermen's cybermats!
ReplyDeleteI think they'd look better as a hovering wave, instead of a piled up wave. I think I'll try and do this with my 2nd edition scarabs.
ReplyDeleteGreat work on moulding the scrabs. I think the base needs something more though. HAve the swarm climbing over something would create a dynamic effect that would help add to their swarm like nature.
ReplyDeleteAnyway we can get a tutorial on the casting of the actual Scarabs? I've seen more one sided castings done but this are models that are completely 3D. I see you had some cast lines down the center so I'd imagine that is where the cast was placed together but you also said you'd do it differently...so...any chance of a tutorial?
ReplyDeleteYes please do a tutorial. i want to do this but am a complete novice and a guide would be massively helpful to get me started :)
ReplyDeleteAlright, follow-up post on it's way! I'll put together how I made the first ones and how I'm making the second "wave" as it were with the mold line in a different location.
ReplyDeleteIt's going to take me some time to get all of them made up since I want to incorporate all the other improvements folks have suggested.
Gorgeous. I'd have spread them over the entire base, but to each their own.
ReplyDeleteThanks! This is a great idea and I was already thinking about how to make a lot of these bugs.
ReplyDeleteThis article saved a lot of my time and money. Thumbs up!
How hard does Blu-stuff dry? I have some mold-making putty from Alumite, which is pretty rubbery. Is Blu-stuff any better?
ReplyDeleteAnon: It depends on how thick you make your mold. You can get some flexibility to it by making your mold thinner, but I've found it easier to make them a big on the thicker side for the stability.
ReplyDeleteIn the end, it's very strong and hard. I've been using my two part Scarab mold for almost 20 scarabs and it's doing fine.
There's not enough 'motion' in the base to make it look like they are coming at you....nothing threatening-looking about them.
ReplyDeleteThis comment has been removed by a blog administrator.
ReplyDeleteI think they would look best if they were flying. I imagine like a flying wedge shape coming off the front of the base. I'd maybe even do something like the High Elf Dragon and have a large piece of terrain they are attached to. Going to try this myself. Been meaning to do more casting and pick up some blue stuff.
ReplyDeleteI'll have my new and improved version coming up this Wednesday. I made some changes and the second swarm looks much better.
ReplyDelete