My previous attempts at mold making were short lived. Nowadays, I try to sculpt what I want (in the case of one-offs) or I'm forced to find a suitable bit that I can buy in bulk to use. I tried my hand at mold making once... I mean gave it an honest go. Now I'm going to try my hand at it again.
My first attempt involved the Black Dragons Space Marines. A friend of mine wanted to add a sculpted shoulderpad to his models and asked me if it was something I could do. Not having done it before, I told him I would give it a go to see what I could come up with.
I started by sculpting my master on a piece of plastic. I kept it to the size I needed so it would fit on a shoulderpad. I figured I would use my modeling clay to create a cast of the shape and then use greenstuff to be able to reproduce a number of the actual icons themselves that could be glued onto the shoulderpads as needed.
It worked... kinda. Who am I kidding, it didn't work at all.
My sculpting skills were lacking and that combined with the loss of detail in the casting process left me with an icon that was barely usable. There was a lot of "fixing" I had to do with paint once I got it onto the shoulderpad just so I could show him what I was able to accomplish.
My second attempt at sculpting and mold making
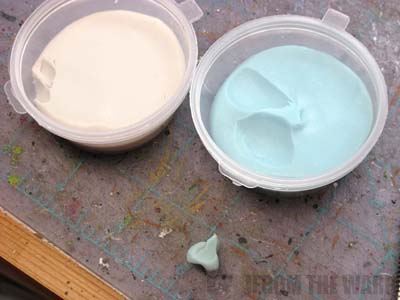
Skip forward a few years and my sculpting skills along with my modeling confidence have improved slightly. After finding a new casting material, I decided I would give it another go. Instead of using modeling clay (the kind you bake to harden) like I did the first time around, I opted to pick up some Blu-Stuff to try out.
A few notes about Blu-Stuff:
At $18 (including S&H) for USA modelers using the current Pounds to Dollars conversion rate, it's priced accordingly. Any higher and I might have passed on the chance at using it. To be honest though, for what it's capable of in the hands of someone who knows how to use it, it's well worth the price.
I'm still learning how to get the most from it, but I know it has huge potential for me.
You get a good amount of the stuff and it says it will last two years on the shelf for those who don't make casts every day. Seeing that you don't use a ton of it when making molds, it's not like you're going to grind through the stuff overnight making molds for your army.
I've made about a dozen small molds and I've only put a small dent in the stuff I have. It's like greenstuff in the respect that you quickly learn how much you'll need so you don't waste it.
It has no odor so you can use inside without stinking up your studio. It says it's non-toxic, but I'm not going to eat it and I still wash my hands when I'm done using it just to be safe.
It's the consistency of say toothpaste that is cold and slightly firm or maybe just the yellow portion of greenstuff if it were slightly warm and gooey. The stuff does not stick to things like greenstuff does though so you can work it in your hands without having to worry about getting it stuck to your fingers.
The directions that came with it seemed simple enough. Mix quickly, press into place on your master and wait for it to cure. And you need to be fast according to the directions. Not knowing how fast the process worked other than reading the directions, I decided to mix some together just to see how quick the whole process goes. It's fast.
I did have this video from their site. I watched it hoping I could learn a trick or two so that this would go as smooth as possible. Turns out it was very helpful to see the actual process as it plays out.
A practice run first to sharpen my skills
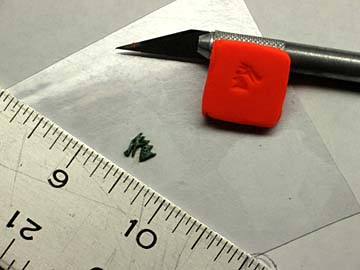
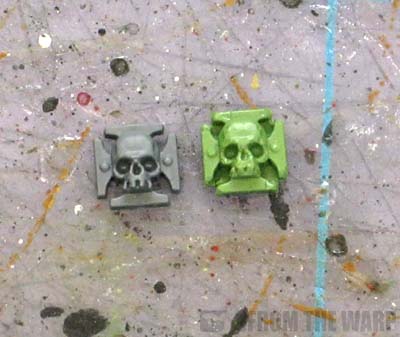
With my speed test out of the way, it was time to try my hand at duplicating a small plastic vehicle icon first. I pulled out a Terminator honors skull and attached it to some plasticard. I wanted to make sure I had an idea of what I was doing with a practice piece before I spent my time resculpting a Black Dragons chapter symbol again.
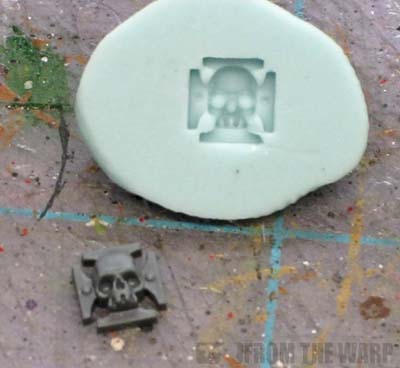
I mixed up my Blu-Stuff, pressed it in place, let it cure and then pulled my icon out. Came out easy as can be with no problems. The detail captured looked good too. I let my mold sit for a while to really harden up and then it was time to make a new icon with some greenstuff.
That icon is 5mm across for those who are wondering about the actual size of it.
It says no release agent is needed so I didn't use any. I mixed up my greenstuff (50/50) and filled in the mold. After a grueling wait for the stuff to cure, I carefully pulled my new skull icon from its mold. It popped out without a single issue.
The greenstuff had not cured completely and I did some damage to it when handling it with my fingers. You can see where I damaged part of the teeth on the skull. Patience is what you need when working with greenstuff. Maybe I'll take my own advice one day.
The detail captured is great. It's more than I anticipated considering I'm an amateur using a quick acting, self-hardening mold material and greenstuff as my casting material.
Revisiting my arch nemesis
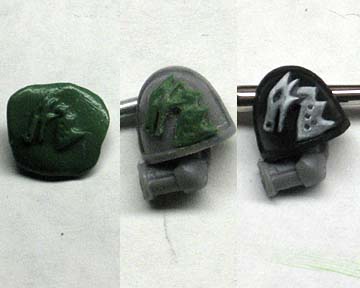
With my confidence boosted, I decided to try my hand at resculpting my old nemesis... the Black Dragon chapter symbol. With a little bit of work, I was able to get it resculpted with better detail this time around I might add.
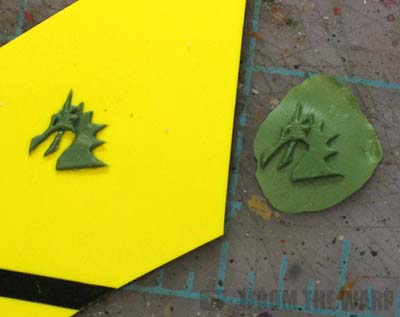
As soon as I had it ready to go, I made a quick one piece mold of it and then set out making a new one from the mold with greenstuff.
Just like the vehicle icon, it came out great. Since I was careful with how much greenstuff I crammed into the mold, I had limited, paper-thin flashing to cut away.
And then the EPIC FAIL.
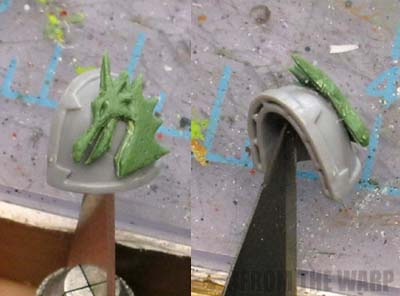
As soon as I had my little icon cut out, I tried to glue it to a shoulderpad. Not only was it too big, it was way too thick to even think about bending it to the curve of a regular shoulderpad. Then I set about destroying my studio by flipping over everything and throwing my desk out my second story window. Well not really, but I thought about it for a second.
So what have I learned with this whole process?
That is the million dollar question isn't it? Let's see... I can tell you that I am one step closer to trying my hand at resin casting now. That's bad because it's one more thing I'll be struggling to figure out for the rest of my life.
If I ever have to make a single piece mold, this is the stuff (no pun intended) to use, hands down. If that's what you're looking to cast, then I would highly recommend this stuff.
Casting single piece molds requires some practice. While the directions may say slap it on there and presto, it works... the reality is a bit different than that. Once you get a feel for working with the materials though, the process is quite quick.
Molding a flat icon and trying to glue it to a rounded shoulderpad doesn't work. Don't kid yourself and think you can do it well enough to pull it off. People will look at your model and know what you did. And the whole point of conversion work is to fool them into thinking you didn't do anything to the model at all.
So like most things I do here, I learned one thing, failed at another and walked away with a dozen more questions. Next week, I'll show you what I did to try and get a sculpted Black Dragon shoulderpad onto a model. I will not be defeated.
At least I can make flat Black Dragon chapter symbols if I ever need to.
The follow-up to this post can be found here.
