
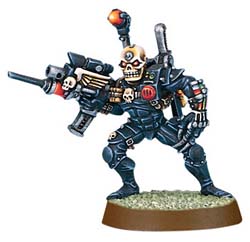
Image from the Black Library
In the end, it may have been just as easy to buy one... but I wanted to see if I could could build my own plastic Eversor Assassin. Besides, I had most of the bits and it was the challenge that really drove me on this project.
I have to be honest though, I did cut a few corners knowing that this guy was going to reside in my display case and go no further. Had I been doing it for someone else, I might have added a few more things to finish him off.

That's it there on the right.
But it has that "old" feeling to it. You can tell because the pose isn't that dramatic. They hadn't perfected the dynamic poses they can get today.
I thought I could do something at least as good as this with the right bits. Well, that was the idea anyway.
A breakdown of my assassin conversion
Obviously it took a few bits from a couple different places to make this guy. Before I started, I knew I wanted to keep one thing from the original model... and that was the slightly over-sized skull head. In fact, that was the only bit that I purchased for this model. The rest I scavenged from my box.
The main part or the body of this guy is an Eldar Guardian figure I think. Whatever the basic troop model is. Nothing fancy and most of the gems were shaved off the model as well.

1. The lamp from an Apothecary backpack. The lamp itself is cut clean from the actual backpack and mounted on a short stem made from greenstuff.
2. Space Marine Scout bullets. These are the tiny bits you add as shoulder straps to Scouts that most people don't bother with.
3. Skull icon from the top of a Space Marine plastic banner pole. I cut the front half off so it would lay flat against his chest armour.
4. Your standard Space Marine bolter scope.
5. Standard Space Marine bolter with the muzzle cut off and moved to the top to allow for the needle conversion underneath.
6. The needle is made from a single crack missile that's had it's nose cone and rear fins cut off.

7. The Chaos Warrior skull that I bought. I had to cut the neck portion down considerably to make it fit in the tiny Eldar neck opening.
8. Sheathed sword from Space Marine Scout set as his powersword.
9. Plastic curved bit (I think a shield of some sort) used to extend his backpack over his shoulder. I added a greenstuff button to the front as well for texture.
10. Eldar guardian arm that has the pointing finger. The finger has been cut off in this case, but it gave me the positioning I wanted for his trophies.
11. More Space Marine Scout bullets... this time trimmed down to represent combat drugs. A pair of greenstuff cables completes the illusion.
12. Standard Space Marine pouches. They comes as three in a row so I cut two away.
13. Don't know what this one is or where it comes from. I've had it for years knowing I would use it some day on a model. This just happened to be it. It's glued to his hand and some greenstuff added around his fingers makes it look as though he's actually holding the hair.
The base comes from Dark Art Miniatures. I bought a handful of them a while ago and I've been trying to use them up as I find a need for them. In this case, it made the perfect ruined warzone type base for this guy and gave him a little bit of height as well.
All in all, he's not in a super dynamic pose. I think the biggest part was just seeing if I could do it with an Eldar body as the base and working up from that. I'd call this a success in that respect. If I had (or built) a more dynamic pose to begin with, I bet I could build something really dynamic like the picture at the very top of the post.
As far as painting, I think I'm going to stick with the standard color scheme.
You can see what the finished model looks like here.
Make sure to check out these posts as they might help:
Conversions live and die in the details
Conversions: Can you "see" the end result?

He's looking awesome Ron! Perfect pose, really befitting. Not super dynamic, but he looks as if he's looking for his next scalp to take.
ReplyDeleteOnly criticism is the size of the head. Not sure if a slightly bulked-out skeleton skull might be better?
he looks great!!
ReplyDeletesadly, the head doesn't look right though. it is just too big. i think a normal skull from a skeleton warrior with a few green stuff additions would look better.
Great job, Ron. This really achieves the look of an Eversor Assassin. The only suggestions I would make would be to move the hilt of the sword to the center of the blade so it looks less like a knife, and maybe add a few electronic do-dads and/or cables to his head with some greenstuff. Curious to know what further steps you would've taken had this model been for a client.
ReplyDeleteGreat Job !!
ReplyDeleteThe bit you cant ID is from the zombie regiment. Great stuff as always Ron.
ReplyDeleteThough you can play a lot with things not being accurately scaled on miniature models, this is one of those cases where something ain't working.
ReplyDeleteI think I agree with previous comments, a bulked out skeleton head, maybe from tomb kings or something...
That base is awesome, thanks for the link to the place. I just did my first base last night/this morning and it totally sux in comparison.
ReplyDeleteI'm pretty far from attempting any conversions at the moment but its nice to see this kind of stuff for inspiration.
Well, the head shouldn't look like a skull so much as a helmet that looks like a skull... so going to the undead ranges isn't actually going to work. I agree that it looks a bit off; painting it will probably sort that out, though.
ReplyDeleteI think those heads being hels is from the old Dark Eldar warrior kit.
ReplyDeleteLooks great! I do agree the head is a bit big, but I don't too noticeably.
It's great to see so many bits come together harmoniously.
ReplyDeleteAwesome, except for the, well, you guessed it, the head. Try swapping in a necron head.
ReplyDeleteThis is a wonderful conversion !
ReplyDeleteAccording to the head, it's an helmet, so it can be a little bigger. It is just the back of the neck which looks a bit too thick. A shot of round file could curve it.
Thanks guys, I appreciate the feedback. I knew the head was going to be a bit "big" for his body when I started and I deliberately chose it for that reason.
ReplyDeleteI love that helmet and wanted to get that slightly awkward feeling to him like the original has although it's a bit more pronounced on mine than on the original version.
I can say that seeing him painted makes the head not so pronounced and oversized.
Gary Therkildsen: If I were to have done it for someone else, my work would have been cleaner. My conversion and sculpting work is a little rough in some areas.
Looks great except for the head. From the side it doesn't look natural. He doesn't have a neck.
ReplyDeleteYeah, I'm love everything 'cept the head like most everyone else. Perhaps after it is finished being primed and painted it will blend together better than it appears here. Great work, Ron!
ReplyDeletesweet now all u gotta do is paint it and it'll look proper good mate
ReplyDeleteOh Sweet! I had this idea as well but did not know how to handle the back. Can you provide a picture of the back?
ReplyDeletehaywire: Nothing was done to his back other than gluing the sword in place. I'd like to say I did all kinds of cool conversion work, but I didn't do anything. It's one of those places where I cut a corner so to say.
ReplyDeleteI think the pic you got form the black library is the wrong type of assassin. It is not an Eversor, but rather the type of assassin that hunts psykers.
ReplyDeleteAnon: I'm not sure it's one either... but it looks cool.
ReplyDeleteThanks for the Creative Inspiration once again and for sharing your techniques with us. Once again you have had your Sunday Best on and I hope you don't mind me giving you a shout in my weekly top x post. Cheers.
ReplyDeleteHOTpanda: I certainly appreciate it!
ReplyDeleteThats not an eversor assassin up top... thats a Culexus.... Still, great conversion
ReplyDeleteAnon: I know... but it looks way cool though and that was enough for me.
ReplyDelete