
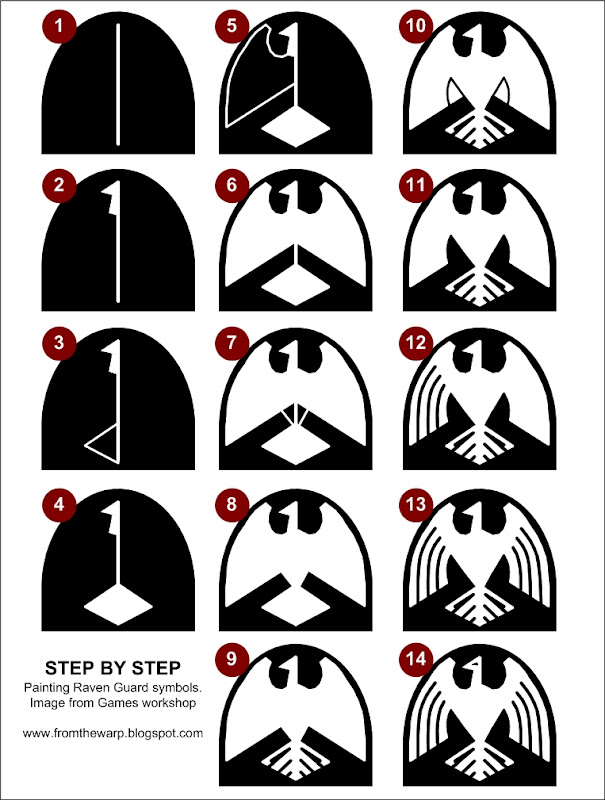
With all the Raven Guard work I've been doing lately, I'd had a request for how I paint the symbol on the shoulderpads. Here's the process broken down step by step.
Now at first glance, this might seem like a bunch of steps for something that Forge World makes both decals and brass etchings for... so why even bother right?
I prefer to paint my symbols on instead of using decals for two reasons:
1. I'm not a big fan of decals to begin with, lots of work.
2. I have the ability to paint them on... but still lots of work.
Wait a minute, what's going on here?
In an effort to show other Raven Guard players how I break down the symbol into manageable shapes to paint, I've included the image above. You can save it to your computer so you have it later on to follow. When you look at the image, the Raven is fairly simple, read it's not exactly like the real icon. This is because I created this in a drawing program and it's more important to get the steps in the right order than it is the actual exact shape of the wings and such. You can make those adjustments as you go along... but you need to know the steps to getting there.
I'm sure there are other ways to do this as well, this can't be the only way. But for those who don't even know where to start, this might help get you going.
Doing this well will require a fairly good detail brush and a steady hand. You can clean up your edges some, but it's much easier if you can get your shapes correct with your first pass. I don't usually thin my paints much, but I will when I paint iconography like this. Just a little bit, you don't need much water to help get your paint to flow smooth. It's easier to make two or even three thin passes with your color than it is to try and get complete coverage in one pass the first time.
It (the image) looks fairly self explanatory, but I may suffer from knowing it inside and out at this point so it looks complete in my eyes. If I've missed something or you've got a question about a part of it, just let me know and I'll do my best to answer.
Here are a few more posts that might help:
The trick to painting icons
Adding freehand and decals to your models
Weathering icons and freehand

Freehand does have one major advantage over decals for many of us, which is that if done cleanly, it's likely to fit a little better with the line style of the rest of the model. Decals have an edge far sharper than most of us can easily achieve with our brush lines, and can jar more for this reason.
ReplyDeleteI find decals a huge time-saver. I usually am putting 2 decals per marine unless their chapter badge is molded. I'd assume that just like getting good at freehand, you need practice to get better with using decals. Completely round decals on shoulderpads are terribly painful though.
ReplyDeleteNicely done. Breaking down your free hand into steps is the only way to have good looking and consitant work. For things like this you'll have to do the freehand but for the more popular armies like templar or ultramarines, the decals are great. You just have to remember/learn how to use your micro sol and micro set and sealant.
ReplyDeleteHowever, people rightfully so take a lot of pride in their freehand. Kudos to those of you out there doing good freehand work!
Cheers for this Ron, I've been meaning to do a tut on painting the RG freehand and you've inspired me to go get it done.
ReplyDeleteI normally have less steps then this, but I've been painting them for a while now so it comes a bit easier. Tempted by the forgeworld decals though just to save me a lot of hastle.
What do you dislike most about decals Ron? I tend to use a combination of decals and freehand as suits the job.
ReplyDeletePorky: Very true.
ReplyDeleteTristan: I do need practice with decals myself. need to sit down and do it the right way though.
CVniton: That is the trick, keeping it consistent. You'll almost always end up with some slight variations when doing freehand, but most of the time, you never notice.
Meatman: I thought about condensing this one into fewer steps but elected to keep it "expanded" to show exactly how I get each part started. I didn't want to just assume people would know what came next or would be able to follow along if I posted the shorthand version.
Da_Sub: There are a couple things.
1. Fitting them to the curved surfaces.
2. Having to use only what is available or making my own (provided you have the equipment).
3. Shading and highlighting them is easier when freehanding them.
4. I can alter them as I want when freehanding to fit my needs were the decals are "as is."
I can see another tute coming up here... I better get to writing around night shift....
ReplyDeleteDa_Sub: Make sure to send me the link, I want to see it for sure.
ReplyDeletethis is awesome thank you so much for doing this. And thanks for really spelling out each step, its really helpful for me since I'm still pretty new to free hand stuff.
ReplyDeleteInquisitor M: I have a huge freehand post coming up where I look at this very thing. It's not so much the hows, but the whens and whys as well.
ReplyDelete