
On a number of occasions, I've been asked to build or convert a model and part of the work includes a psychic hood. Part of a psychic hood is the pair of power cables that run up the sides of the chest.
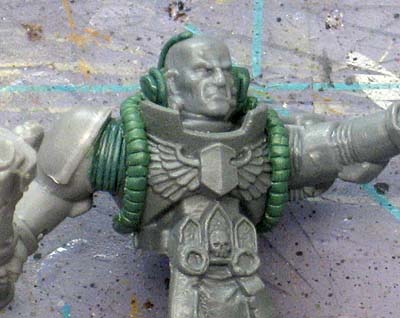
Until recently, I've always sculpted them out of greenstuff. It's fairly easy to to do and with a little patience, you can get some nice looking results.
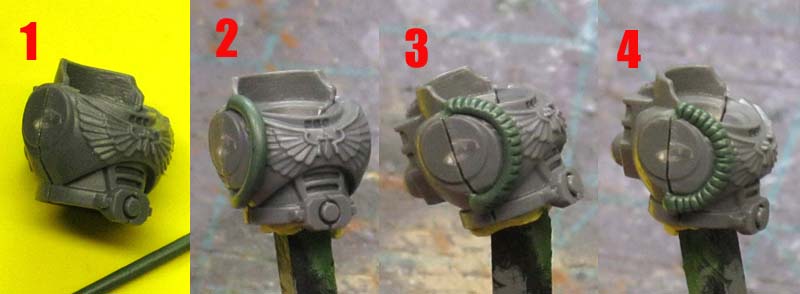
1. First you roll out a thin length of greenstuff in the diameter you want your cable. Make sure you have enough to do both sides of the chest.
2. Cut a short section (slightly longer than you'll need) and attach it to the model starting at the top. The excess can be cut away at the bottom where you can hide any potential mistakes.
3. Carefully press the greestuff onto the model, but no so much that you deform it. This is the tricky part of the whole thing.
Use your X-Acto blade (a regular GW sculpting tool is not sharp enough to do this) and cut a series of ribs into the power cord. It will take three passes on each cable. Once on the top (upper most facing surface) first. This will flatten the cable out slightly, but will help it adhere to the model as well. Make sure your blade stays wet so it doesn't pull the greenstuff away from the model!
4. Then cut once on each side of the cable. It's too hard to make the ribs in one pass so it's better to make them using a series of short cuts combined together. And you need to make sure you side cuts line up exactly with your top cut so it looks consistent.
There's really only one problem with this technique though... your cables really do need to be lying on the surface of the model for it to work. They can't be suspended or hanging down.
Actually they can, but it requires using an underwire to support the cables and you have to wrap them with greenstuff and then cut your ribs into it. A huge pain in the backside and not for the faint of heart.
Recently (within the past month) I was able to get my hands on some guitar strings. I went to a local music store, told them what I was looking for and why and asked if they had any "extras" lying around. After they got done laughing at me, they were kind enough to give me a handful of different sizes I could use for something other than playing the guitar. Nice guys they were.
I've always seen cool looking conversions where the person used a guitar string to replicate some kind of ribbed power cable attached to some important point on the model. I've always wanted to be able to do that myself and be like the big guys.

You can get them from his store here.
Anyway, I send Jeff and email asking about his pewter ones. Here's his reply:
I can 100% guarantee you you will throw away your guitar strings after you try these.
Very bold I thought and picked up a set right away. I couldn't wait for them to arrive so I could see just well they would work out compared to other materials like the guitar strings. Once I had everything together, I decided I would try to make a standard Librarian psychic hood with my new materials.
I had some guitar string, some pewter cables and some greenstuff.
I knew the greenstuff method would work, so I skipped right to the guitar string.
What a huge pain in the backside to use.
The stuff is incredibly hard to bend and I can't cut it with my X-Acto knife. To get it into the correct shape, you need to bend it past what you need and hope it springs back into the shape you really do want. I can't believe people actually use this stuff. Thank goodness I know how to greenstuff them in place.
It's also fairly hard to get a nice smooth bend to the guitar string.
I think I'll be setting these aside for something else... like maybe the trash.
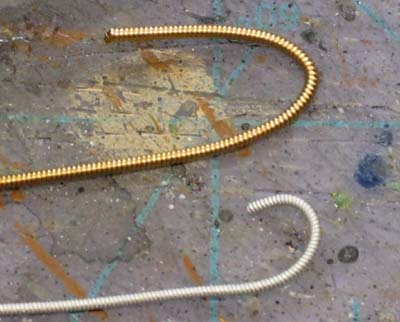
Then I tried it with the pewter ones. It was night and day difference.
They're easy to bend, they keep their shape, you can fit them exactly how you want them without having to overbend them and hope they spring back into the correct position.
They cut easily with an X-Acto blade too. It took me no time at all to get one shaped how I needed it and cut to fit for my Librarian test.

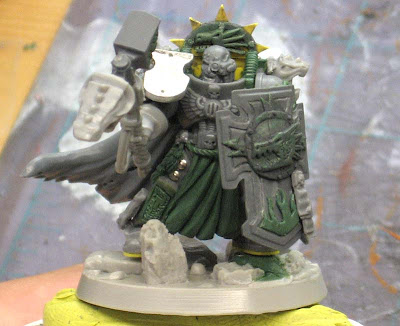
The test cable in place
So it comes down to the greenstuff or the pewter ones and looking at the differences between the two different methods.
The greenstuff ones really need a surface to lie on, the pewter don't.
If your cables are lying down on a surface, this is no big deal. If your cables are going to be suspended, this is a big issue.
You have to sculpt the greenstuff where the pewter come ready to go.
This is definitely nice. Not having to sculpt them saves some real time.
Pewter ones will have some mold lines.
Not a big deal, but can be problematic for some folks to get them cleaned off such a textured surface. The mold lines on the ones I got would have cleaned off with little to no trouble at all.
The pewter ones have a consistent diameter, greenstuff may vary.
This is a very nice feature. That's one of the big issues with sculpting them with greenstuff... getting them consistent so they look "right."
The verdict: The pewter ones are definitely worth it. It's going to take me some time to figure out how best to attach them and learn the finer points of shaping them just the way I want, but these guys will give me that added extra realism to my models and save me from having to greenstuff the entire cable. Now I'll only need to greenstuff the attachment points.
Looks like Jeff was right, my guitar strings are headed for the trash.
EDIT: Painting Munky Style was kind enough to offer up a link to his method for making power cables as well in the comments. Since I don't want to deep link, you can check out the comments for the link (cut and paste) to the full tutorial and I've posted a summary here. Thanks Munky!

Using 24 gauge floral wire, he wraps it around a paperclip and pushes it tight into a coil. Once he has it long enough for what he wants to do, he takes the assembly and bends it to shape around a suitable object (the handle of his hobby knife or a pen, etc.) and cuts it's to fit.
Note: I did not mention prices in this post because I got the guitar strings for free, almost everyone has greenstuff lying around and I figured if you're going to be doing this kind of conversion work, the cost of the supplies (pewter cables) isn't going to matter anyway.
UPDATE: These days, if I find myself needing to make any kind of power cable or hose, I use the tube making tool from Green Stuff Industries.
Additional Tube tool reviews:
Masq-Mini Ultimate tube tool review
Green Stuff Industries tentacle maker review
