
As part of the Back to Basics series, this post looks at painting a "metal" model by way of painting his armour in metallics. Today we're venturing out and trying our hand at a power armoured Grey Knight. With new Codex rumors and release dates floating around, I figured I might try something that might help a few new Grey Knight players get up and running with a painted force. Again, I'm going to paint him by sticking to simple techniques like base coating, washing and highlighting. Nothing fancy like wet blending or any other "advanced" techniques.
Actually, that's a lie. I have introduced something new in this post. The idea of stippling. It's not difficult to do and actually is very forgiving in this approach with metallic colors.
The idea is that you use the tip of your brush to dab the paint on it itty-bitty dots. Get enough of them close enough together and you can shade or in this case, highlight a model. Kinda like adding battle damage where you use your brush or better yet, a sponge. But in this case, it's much more controlled, deliberate and careful since we're working with smaller areas and we need to make sure we blend our stippling into the surrounding area.
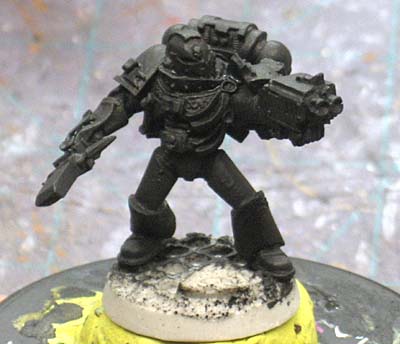
We start with our model primed/basecoated black. Again, to help us with the shadows and this guy is going to be dark anyway. I've gone with a darker metal on this guy instead of the "traditional" lighter metal for two reasons.
1. I like the darker look to the model.
2. With a little bit of work, I can add some real contrast to this guy.

With him basecoated, I start with the inside portions once again. Here it's the eyes and the flex fitting around his joints.
The eyes are done a bit different than my usual approach. They are painted with a light blue to start with, given a wash of GW Asurmen Blue and then I went back in with the original color and added a highlight in the center of the eye. It's a quick version of object source highlighting without the surrounding glow (I promise no more fancy tricks!).
In the end, it simply gives them a different feel than the usual highlight with reflection you see all the time on models. I would be remiss if I didn't mention Tales from the Warzone as my inspiration for painting the eyes like this. His post on his Deathwing (my favorite army) gave me the idea.
TRICK: The flex fitting is nothing new to you guys, you've seen it before here in the light colored primer post. Like I've said before, once you paint enough, you'll start to develop shortcuts or formulas for things and it just becomes a matter of applying the right formula to the right part in the right order. And here you guys thought this was art.

With our two inner elements done, it's time to get to work on the major part of this model and the reason we're here in the first place. The armour.
I start with a gunmetal type metallic. It takes two coats to get a nice, smooth finish on him, but it's important to get all the metal areas covered nicely. Now I did use a silver metallic on the ammo belt feed, gun barrels and blade on his halberd. This is for variety. I want to show these are not made of the same material his armour is made of.

With the armour base color down, all that's left is two washes and some highlights before we can move on to the final bits. The first wash is done with GW Badab Black. We're not looking to drown the model, simply cover the metal areas. You can tell from the photo that the metal tends to get dark quickly.
While washing the model with the black, make sure to hit ALL the metal areas along with the flex fitting joints.

And the second wash after the black is a thinned wash of GW Asurmen Blue. What we're trying to do here is add some color to the metals and get rid of that flat black look. You can also focus on the recessed areas and use the wash at full strength (in those recessed areas only. It will help add some color to the shadows. You'll want to be careful how much blue you add... it'll depend on your personal taste in the end, but you don't want him looking like a poorly painted Ultramarine when it's all over.
The blue wash is NOT applied to the halberd blade, the gun muzzle or the ammo belt feed. We want the areas washed with the blue to be the armour only. It will help differentiate between the various metal elements on the model.
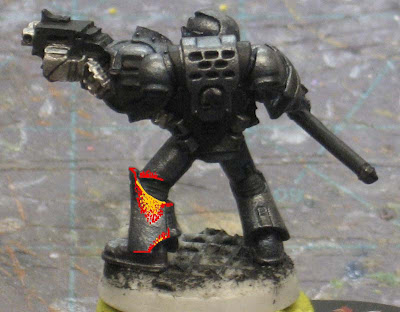
And now for the highlighting of the metal areas. Don't sweat it, it looks harder than it really is. Even though the black and blue washes darkened down our metal, it's not so much that we can't go right back in a add some contrast to the model fairly easily and not have to worry about be super perfect with our brushwork.
I've included this diagram if you will to show you how to add an extra touch to your highlighting. You could simply go in and line highlight the edges, but if you take one more step, you can get some really cool results. This is where we use the stippling effect. You don't need to load your brush with paint since you're just looking to add a little bit of the highlight color and then blur the edge where it is on the model. In the end result, we don't want any hard edges for the highlights. We want it to "fade."
There are two areas shown, the red and the orange. The red is where we would add our original metal color back onto the model. Any place that light would hit it really. The tops of the shoulderpads, the tops of his arms, knees, his helmet, etc. The orange color is where you go back in with a silver color to really get the contrast and add some dimension to the model.
TRICK: If you want to know where the light will fall on your model from an overhead source, you can hold it in such a way that you are looking directly down onto the top of the model. Look at what surfaces (and portions of surfaces) the light would hit and then turn the model so you can paint that one small area. Repeat for the next small area.
You don't have to be exact with your highlighting. In fact you can use your normal highlighting formula and just extend it out a bit. Like the picture, I would normally line highlight across the top edge of the greave. Here I did the same thing and brought the highlight color down onto the greave a little bit.
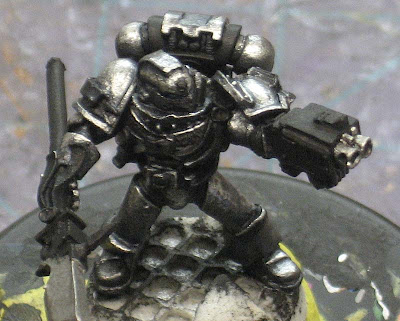
And the results. When done correctly (which is not tough), you end up with a metal clad model with some nice transitions and color in the shaded areas.
NOTE: I don't mention it anywhere else in the post so I need to do it here. His halberd is done with a series of washes of GW Badab Black. I kept the washes to the flat surface of the blade and did not highlight the beveled portion of the blade edge. This gives the edge a "sharp" look when I went back in and line highlighted it.

And with the armour done, we can move onto the smaller elements.
Since we have the majority of the model done now, we'll need to be somewhat careful as we work on the surface elements since we don't want to ruin all our previous work. We'll start with the gold areas next.
1. Base coat all the gold areas with a warm brown color. I thin it slightly so it does not obscure any of the detail on the model. You don't need a perfectly smooth coat, you're just trying to get rid of the black to keep the gold from looking so dull.
2. Add the metallic gold. Here I used GW Shining Gold. The beauty of having the area based with brown is that you don't have to worry about covering every little bit with the metallic color. If you miss a small portion you won't even notice.
3. Wash the area with GW Gryphonne Sepia followed by GW Devlan Mud in the recesses.
4. Go back and reapply your original gold color as a highlight or you can use a slightly lighter shade to really get some contrast. Since I went with the high contrast on the armour, I decided to use a lighter shade of gold to highlight here as well.
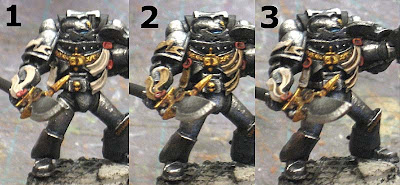
And now onto the last real elements on the model. The purity seals and iconography. Grey Knights have a very limited palette of white black and red. In this case, we're going to use some GW Foundation colors to keep things moving.
1. All the red areas are based with GW Foundation Mechrite Red.
The purity seal paper is done with GW Dheneb Stone.
2. Both areas are given a wash of GW Devlan Mud.
3. Go back in with your original color to add some highlights.

We finish off this guy by line highlighting the black areas on the model (the gun casing, halberd staff and a portion of his backpack) with a dark grey color.

And the finished model. I went in and finished the base off using warm colors to contrast against the model's cool colors. And that's it for this guy. If we were to tighten up our technique here, you could potentially have a great looking force on the tabletop in no time at all.
And this technique can be modified as well. If you're a fan of the lighter metal traditional version, then simply start off with the silver and skip the gunmetal portion. You can vary the amount and number of washes you do as well to shade him to the point you like as well.
Make sure to check out Dave's "metal" model for this week.
Comments and questions welcome, but please keep in mind this model was kept simple and I didn't cover a number of things that can get complicated... it's just the basics.
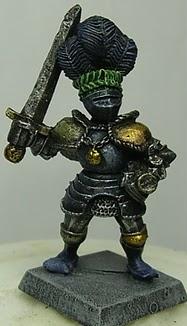
And as an additional bonus, I had a reader send me some pics of a model he painted using a variation of the approach seen in the Fantasy model post. Again, just another way to paint metallics.
I took the spirit of your tutorial and applied it to amour not a shield. I was also going for a dark feel so I stared with a Tarnished Steel and Honed Steel (both Reaper Paints), then started to add wash after wash, of different colors, on top of that. Then in the end coming back with Bolt Gun Metal (GW) to make the edges stand out. So the peices was not too dark, I used a brass paint on the shoulder as well.
Check out the entire Back to Basics Series here.
