How to paint black armour


Image from Games Workshop

I've decided to try and figure out the best way (or maybe the way I like best) to paint black armour. This is not a tutorial as much as it is an experiment in painting black a number of different ways.

Some background first... I've decided on the black paint scheme for my new Deathwing (cue Fallen jokes now). I know I can do the white scheme, but getting black to look good is the real challenge. Besides, it makes for some great conversations. So, I set out to find a way to paint my guys. I mean I already have one method, but I wanted to see if there was something else out there I could do that might make them look even better on the table. With only 10 guys, I can afford to spend some time painting.

I went researching and looking at all the pictures I could find, all the forums, bulletin boards, chat room... anyplace with anything related to painting black armour. There's not much out there honestly. I did find a handful of things that caught my eye though and I tried my hand at them. Here are my results:


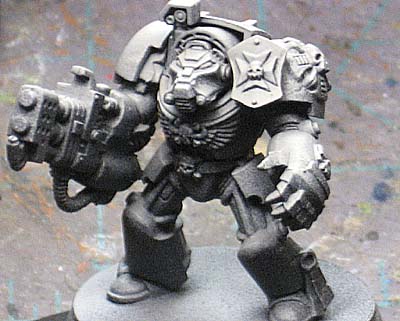
First up was a power armoured marine for some testing.
His right leg saw a black base coat followed by silver drybrushing along the edges to simulate considerable wear and tear on the armour. No good in the end. The scale is all wrong with the drybrushing.

So I tried the same thing on his left leg and carefully applied the weathering to the edges. Like all other weathering, it's a fine line between just enough and too much and that line can be hard to see sometimes. I tried using washes to tone down some of the weathering, but found it to look more like a mistake than a heavily weathered suit of armour.


Next was basing him black and then going over all the armour plates with GW Foundation Charadon Granite. This lightened them slightly and gave me some variation to the armour. I used washes to tone down the darker or shadowed portions of the model (imagining an overhead light) and then went in with a slightly lighter shade for an additional highlight on key spots. I kept the weathering very light here. I wouldn't call this a success either since the final look did not appeal to me really. Looked ok, but just not my favorite.


Tried it again on this leg without the base color and just added the blended highlights. Needs to be much more of a gradation and a lighter highlight for this to really work I think. Too subtle for it's own good. Fail.


Up next was the idea of zenithal highlighting or imagining a strong light directly above the model that highlights just the upper most surfaces. I tried this using the "standard" technique if you will of painting it black and then using a light grey (almost white) spray paint to "map out" where the highlights would be on the model.

It only takes a couple of quick blasts from overhead to get the effect. You have to get the correct distance and amount of paint on the model, but it's not impossible with a little practice. I think this might work better with an airbrush because the spray paint leaves little specks all over the model and it's not a smooth transition. Get a smooth transition to start and your life will be much easier.


I took the zenithal highlighted model and tried to smooth out the transitions with layers of washes. Some progress, but now I understand why this works so well with other colors. Black on the other hand... not so well. This guy, despite looking rough, still stands out the most on my desk because of the extreme lighting. If I were doing another color, this would be the way to go, in this case, it's not for me.


And this is what I keep coming back to. The fine line highlighting and going back with a lighter shade and reinforcing those highlights in key areas. I just like the look of this kind of painting. I can use the zenithal look/approach on elements on the model to help reinforce the lighting, but black armour just looks the best this way to me.

I think the trick for me will be to go the line highlighting route and apply some zenithal highlighting principles to where I apply my strongest highlights to really focus the model. I may still try the blocking out of the armour plates with the GW Granite again and maybe adding line highlights to that for some variations. We'll see.

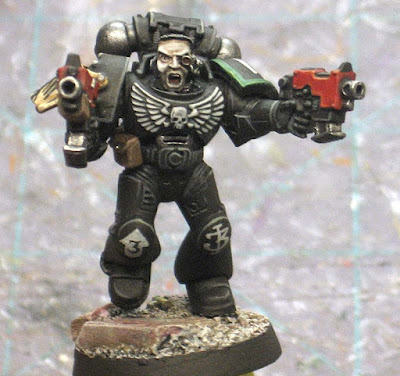
As a side note, I figured out how to paint the gold elements on the model and I really like how they look. Now I just need to figure out a good method for the "red" elements.

And a special thanks to Maxime for his help with this too. He gave me some tips to try out, namely the Grey method with the Badab Black wash for effect.

And the follow up post to this one can be found here.

Make sure to check out these posts as they might help:
Line highlighting black armour
Painting black armour, it's in the details


Ron, From the WarpIf you've got any questions about something in this post, shoot me a comment and I'll be glad to answer. Make sure to share your hobby tips and thoughts in the comments below!

18 comments:

  1. When I first started working out how to paint my black armoured space marines I came to pretty much the same conclusions as you have. I started of with a line higlight of 60:40 chaos black/codex grey and then went back over the extreame edes with pure codex grey. I think the trick is not making your final higliht to bright as it will provide to much of a contrast with the black and to also use your final highlight sparingly as to much of it will make the model look contrived and unatural. Im still trying to find a good gold recipee though, would you mind telling us how you plan on doing yours?

    ReplyDelete
  2. Snake88: Absolutely. Once I settle on something for sure, I'll be certain to share it.

    ReplyDelete
  3. You going to have 'Broken Knife' Gabriel as your commander?

    ReplyDelete
  4. MCT: I may, I haven't gotten that far honestly.
    I think once I figure out how I'm going to paint some of the smaller details, I'll sit down and map out the markings for each of the termies.

    That will help me plan out the sculpting I need to do as well for ornamentation on their armour.

    ReplyDelete
  5. Black can be tricky. I've found that chaos black+codex grey 4:1 as a base is good, then 4:2 for a general highlight, with a touch of skull white added for final line highlighting works quite well. You then wash the whole area with badab black to blend them all together and accent the most shaded areas.

    ReplyDelete
  6. Painting historical miniatures Black is a lot easier - just highlight with Flesh! The Space Marine and Terminator miniatures from GW are a lot more difficult and so far I have not painted a black armoured figure well enough to post images.

    I've enjoyed reading the Post - thank you.

    Tony
    http://dampfpanzerwagon.blogspot.com/

    ReplyDelete
  7. Ron, you're welcome.
    It was a pleasure to give you some pieces of advice!

    ReplyDelete
  8. Black highlights I think a hint of blue or brown added with your highlighting be it zenithal highlight or fine line highlighting just might help with smoothing and give a better over all feel.

    just my humble thoughts on highlighting black

    ReplyDelete
  9. It'll be a lot easier if you make it a greyish-green-black mix as a base and then just use black washes to tone it down. It'll also contrasts lots against white or red insignias. After all, they're Dark Angels, they don't care if they don't look "light enough" to their enemies.

    ReplyDelete
  10. looks like its too late to talk you out of black.

    If you must do black, try a bit of blue in the highlights with a black wash to knock them down a bit.

    I use mech. red foundation paint as a base for reds with Blood red over it adding a bit of blazin orange in the highlight.

    When you finalize your formula, I am going to try it on some of my Ravenwing.

    John
    Santa Cruz Warhammer

    ReplyDelete
  11. I've got five Legion of the Damned marines to paint so I'm quite interested in what you come up with it. Have you seen GW's guide to paint LotD? I have some memories of them basing with a blue/black mix of some sort.

    ReplyDelete
  12. Flekkzo: indeed, it was in white dwarf and also on the GW Blog (the latter without step-by-step)
    http://www.games-workshop.com/gws/content/blogPost.jsp?aId=7200001a

    ReplyDelete
  13. I appreciate the help guys.
    I think once I can get a test model completed, I'll post the results here for critique.

    ReplyDelete
  14. Might want to try Adeptus Battle Grey followed with a black wash. Thats how I start all of my black armored miniatures.

    I'm really digging the z-lighted terminator.

    ReplyDelete
  15. Just in case you're interested I saw a great tutorial which explained why highlighting black is so hard and how to go about keeping your black looking black instead of turning grey when you add your highlights.

    It was over in the jungle, by Roman I think. I'll go away and come back with a link. 2 ticks.

    Ok, here you go

    http://massivevoodoo.blogspot.com/2010/07/painting-jam-02-blood-angels-faq.html

    This is probably the best explanation I have ever seen. The guy is an excellent painter too, so it comes with his expertise as support for his explanation.

    ReplyDelete
  16. Thank you everyone for all the support and links. It's been a huge help in figuring out how to do this.

    ReplyDelete
  17. I know this is old but did you ever share your techniqure for painting gold?

    ReplyDelete
  18. Matt: I don't think I have. Unfortunately, it's going to be a few weeks before I can get something together. Unless I can mine some of my older work and use them as examples. I might try that to show you the few methods I use.

    ReplyDelete

If you've got a relevant tip, trick or link, make sure to include it in your comment for the rest of us to check out!

Note: Only a member of this blog may post a comment.