Brush Care & Feeding: Pt. 2 - Brush Cleaning


This is a Guest Post by misterjustin

This is the second of a two part follow-up to Ron's post, "All about (my) brushes," with tips on brush care and cleaning.

In part one of this follow-up I covered the anatomy of a brush and some things to look for when selecting a brush. In this article I'm going to cover the care and cleaning of both natural and synthetic brushes and look at some basics tips for brush usage.


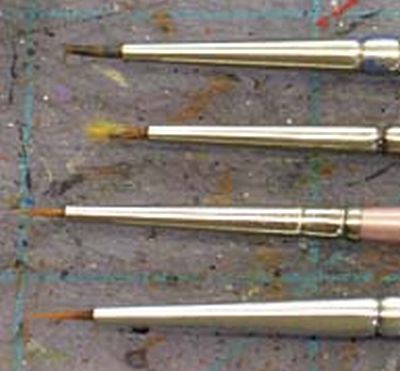
This image was taken from Ron's original article and enlarged so you can see the bristles and ferrule more clearly. He described these brushes as his "medium work" brushes and they are 3/0, 3/0, 10/0 and "Precise Detail" respectively. Now I'm going to pick on Ron a bit by drawing your attention to some signs of improper use and care.

In the top brush you can see a grey ring that starts about 1/2 way down the bristles. You'll also notice a slight bend to the brush and a splayed tip. The second brush has a very yellow tip and on the third you can see some old yellow paint near the ferrule. On all three of these you can also spot signs of old paint on the ferrule. The last actually seems to be in fairly good shape.

We'll come back to why I'm picking on these brushes but first I want to look at another set.


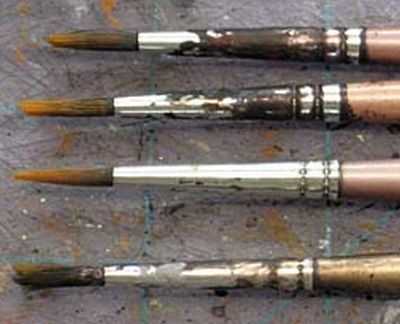
This image was also taken from Ron's original article and enlarged so you can get a look at the bristles and ferrule. Ron described these as his "big work" brushes... and they're a mess. You can easily see old, dried paint on the ferrule and in the bristles.


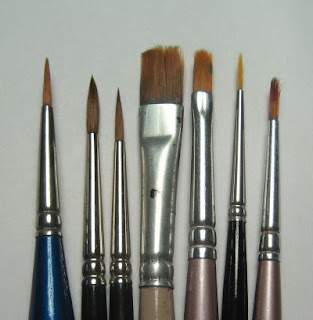
By contrast, this image shows a sample of my own brushes, both natural and synthetic, in similar sizes and from some of the same brands. From left-to-right: The first is a Loew-Cornell synthetic #2 and I've been using it for at least a year. The next two are my Raphael 8404 #1 and #0 respectively, each a little over two months old and both shown here dry. The other four are a random grab from my brush cup and each is at least six months old; all of them are synthetic.

Proper cleaning makes all of the difference. So let me make this point exceptionally clear, on a line of its own:

It is almost impossible to remove dried acrylic paint from natural or synthetic bristles.

There are products out there that will help soften the dried acrylic paint in your bristles but, in the end, the damage has been done.

Tip #1: Never, ever let paint dry on your brush!

This is where the importance of thinning your paints and having a decent reservoir are really highlighted.

If you're painting straight from the pot you can achieve some thinning by simply dipping the brush in water between applications. Dip the brush in water; dip into the paint up to no more than 1/2 of the bristles (or run one side of the bristles against the lid or palette); dab excess water off on a paper towel; apply to model; repeat.

If you're using a palette and thinning your paints to a more watery or milky consistency then you can simply rinse the brush every few applications.

Tip #2: Never use hot water!

The bristles are held into the ferrule, and the ferrule to the handle, with the use of glue. Hot water will weaken that glue and can loosen the bristles. Cold water is better for your brushes although lukewarm can be used for particularly messy clean-up.

Tip #3: Use some soap, ya dirty hippy!

If you use soap only use brush. Dish soap, washing up liquid, hand soap and the like will strip natural oils from hairs and can leave residue on synthetics. However, and this gets its own line too:

USE BRUSH SOAP SPARINGLY

You don't need to soap your brushes every day if you're caring for them properly. Every 2-3 uses is generally adequate.

Tip #4: Natural brushes want natural turpenoid!

Using alcohol will dry natural hair brushes and damage their unique water wicking properties. A quick dip into natural turpenoid will help clean your brushes AND condition the hairs. Do this after every 2-3 soap cleanings.

Tip #5: Use a cleaning pot!

Although not essential to brush care a brush cleaning pot, designed with 2-3 chambers, or multiple cups will further extend the life of your brushes. Using a single cup means that you're cleaning your brush in water that contains progressively more paint. It's like washing dishes in yesterday's bath water. Using multiple chambers or cups means that the additional rinses are done in cleaner water.

Regardless of whether you're rinsing multiple times or in one cup make sure you're using plenty of water. The more water in the cup the longer it takes to saturate with paint.

I picked up my 3 chamber pot at Michaels in the USA for $1.99.

In Summary

By taking proper care of your brushes, whether they're natural or synthetic, you can extend the life on them. This will save you money AND improve the quality of your painting since you won't be working with damaged brushes.

And last but not least, a quick video with some tips on how to use both natural and synthetic brushes to extend their life, whether you're painting directly from the pot or using a palette.


A huge thanks to misterjustin for taking the time to put this together. I appreciate his willingness to share his hobby knowledge with the rest of us painters. - Ron

NEXT: Finally, someone took pity on me and sent me a "good" brush to use.

Ron, From the WarpIf you've got any questions about something in this post, shoot me a comment and I'll be glad to answer. Make sure to share your hobby tips and thoughts in the comments below!

10 comments:

  1. My brushes could be the long lost twins of Ron's brushes. But, this article has inspired me to put a bit more effort into caring for my brushes. I think my biggest brush problem is going to the store to buy one. There are so many choices at so many price points. I know some are better than others, but with all the choices it gets a little confusing at the store.

    ReplyDelete
  2. misterjustin, that last brush of yours on the right looks exactly like one of my brushes (same brand and everything)...it has the same exact furling going on. Any specific reason why a brush furls like that? I don't have that problem as much with my Loew-Cornell synthetics.

    ReplyDelete
  3. Thanks for the tips. I've been making an effort to take better care of my brushes, but I do have a few bad habits that I still need to break (getting paint into the ferrule and generally using fairly thick paint).

    One thing that I haven't been able to figure out is why all of my brushes hook at the end. Almost every one of my brushes develops this hook at the end after fairly short time using them. I don't buy really expensive brushes, and I try to keep them clean, but inevitably they hook. I don't know if it's something in my painting technique or lack of cleaning. Any helpful hints on preventing this?

    ReplyDelete
  4. Rkik: I'm not sure, misterjustin may have the real answer, but I think it may be because you use the tip of the brush to paint with and dab or poke at the model like I do sometimes... since my brushes will develop that "hook" to the tip as well.

    I think by trying to paint with the side of the brush and not with dabbing the tip, you can help prevent that "hook" from developing.

    But this is all speculation on my part.

    ReplyDelete
  5. Re: the hook, I have this with synthetic brushes but I haven't see it with my natural fiber brushes.

    I may have been using brush soap incorrectly all this time. I use it between colors for some pigments - like P3 black which is hard to get out of natural fibers with just water - so multiple times in one sitting is the norm. My brushes seem to be holding up; still look new and about 8 months old now with daily usage.

    ReplyDelete
  6. Hey folks, thanks for the comments. I am, once again, glad to see that folks are finding the article useful.

    @The Inner Geek: For synthetic I recommend Loew-Cornell 3000 series. Your local art store should have them. For natural I recommend Kolinsky sable brushes. My favorite is the Raphael 8404 series and you'll find them in my store -- but I stock them because I love them and don't love them because I sell them. Promise :)

    http://www.secretweaponminiatures.com/index.php?main_page=index&cPath=29

    You will also find a comparison to the Winsor & Newton Series 7 - the other popular Kolinsky sable brushes - in the "Tips & Tutorials" section on the site.

    @blang86: The furling happens more easily with synthetic brushes as a taper is not their natural state. Not with moderate cost synthetics anyway. See part 1 of this article for a look at that. Leaving a brush in water will also speed up the loss of spring in a synthetic brush.

    @Rkik: Same applies here as with blang86 - synthetic brushes are more prone to hooking. More expensive synthetic brushes have a greater taper built into the material but can't compete with sable even at the low end of quality.

    @RonSaikowski: Yup, you're also right that pushing with the tip will speed up the hook. Again, this comes back to the tendencies of the material as well though. Tip painting simply speeds up the process.

    @Charles Feduke: Soaping between difficult to remove pigments is a good idea. You might be over soaping but if you're rinsing well, and changing water regularly, this will help -- although at 8 months you're not hurting. Try some natural turpenoid if you start to notice the bristles getting overly dry.

    Keep the questions coming folks, I do loves me the Q&A! :)

    ReplyDelete
  7. Right now my brushes look worse than Ron's. Would it be wisest to start over fresh?

    ReplyDelete
  8. Yup, start over. You'll be happier for it in the long run.

    I recommend picking up a couple of synthetic brushes and at least one natural. In my personal order of preference:

    1 and 0 in both natural and synthetic.

    You'll be out $30-40 but if you take care of the brushes they'll last you at least six months -- a year if you don't get lazy ;)

    ReplyDelete
  9. Here comes some questions:

    Why get both synthetic and natural? The little exposure I've had to synthetic has been poor indeed after all.

    I usually use the wet brush and then into the pot method, but I have wanted to thin the paint more so that I can get a more even application. Especially important when painting yellow:) The trouble I have is that I have just thinned it with water lately and what happens is that it is hard to load the brush to a level where I can paint with it. Usually I get far too much paint on the mini (looks like it "swims" on top of it) and give up my tries.

    I currently have GW brushes and a few others (that I haven't found to be better) and my question is simply. Is it the brushes, the palette (I have a cheap plastic palette, not any kind of wet palette), the thinning, or me that makes it blob out paint? Trying to load it less just makes it hard to get paint on the mini at all.

    That said I am going to use up some of my Birthday money buying some Raphael brushes. I am hoping that it will be a sound investment for me :)

    ReplyDelete
  10. I recommend natural and synthetic brushes out of habit because I work with some materials I wouldn't use my natural brushes for. If you're only using acrylic paints then I would recommend only natural brushes.

    If you're getting too much paint coming out you need to wick out some of the moisture. Check out the video where I dab my wet brush on the paper towel. I am removing some of the excess water. It takes a small amount of paint with it, sure, but leaves me enough to work with. This will give you a lot more control.

    I do recommend the Raphael brushes and think you're making a good investment there - but take a look at the article on Secret Weapon comparing them to the Winsor & Newton so you can make a well informed purchase -- even if you buy the brush elsewhere.

    ReplyDelete

If you've got a relevant tip, trick or link, make sure to include it in your comment for the rest of us to check out!

Note: Only a member of this blog may post a comment.