Wet blending... that's a tough one. It's almost as much art as it is science for me. I've actually posted some of this before, but it wasn't anywhere as in depth as what I'm putting up today. The previous post on wet blending barely scratched the surface.
Wet blending can be done a bunch of different ways I'm sure. Just like everything else out there. Without any formal knowledge or training (as it relates to painting minis), this is how I decided to tackle the process and make it work in the few places I apply it to my models.
The difference between wet blending and layering and glazing
I think these few techniques get confused sometimes... for me, they are completely different things.
Layering is a process where I'll start with one color and then add additional "layers" of paint over that (usually lighter in value) leaving a little bit of the previous layer showing along a predetermined edge with each pass. This is a great way to "build up" highlights and have a smooth transition between the lightest color and the darkest color.
My layering is also usually done with opaque colors. You end up thinning them out so much that they start to loose their opacity, but most of time, you're looking to make a transition from one color to another or add a highlight/shadow to a spot on your model. Each layer goes on top of the previous one.
Sometimes folks even confuse glazing and layering. Glazing is where I use things like inks or washes to alter the original color. The difference for me being that I want to keep the original color, just add some subtle variety to it. For example, I have a red shoulderpad and I want to make it a rich red up top by adding a Gryphonne Sepia wash, but use a Leviathan Purple wash down near the bottom to cool the red down a bit to reflect the portion in shadow.
I'm still working with a red shoulderpad and I don't want to change it, just create some variety.

So how do you wet blend two colors?
Once I have the area on my model that I think warrants wet blending and not layering or glazing, I'll look at the colors I'll be using. Most of the time it's the base color and black or a very dark color for the shadow areas.
Depending on how opaque the base color is, I'll work one of two ways. In the example above, I wanted the cape to be more red than black, so I painted the entire thing red first. If I wanted it to be more black than red in the end, I would have started with black. It doesn't change the actual process, just where the final look of the piece falls... do you want it more dark or do you want it more like the base color?
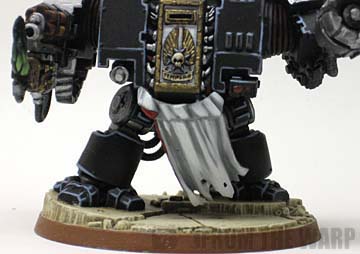
| Note: Wet blending is not the answer to everything. While it can be a complex process and involve some time, it still needs to be supported by other techiniques. If you look at the red cape up above, only the recessed area shading on the cape was done with wet blending. The weathering along the bottom was done with washes and drybrushing. The fine edge highlights were done with careful line highlighting. |
I'm going to use the banner below as an example of how I go about "blending" the two colors. Don't try and do the whole thing in one pass, make sure you keep your sections in manageable sizes. Here, I painted one side of the banner pole at a time.
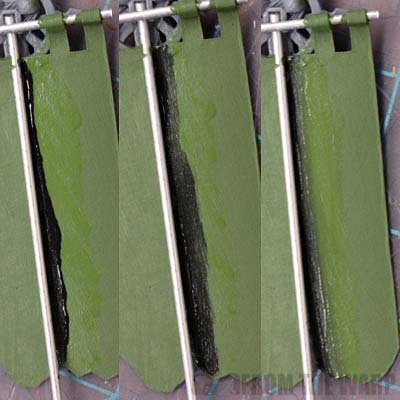
Since I wanted the banner to be more green than black, I started by painting the whole thing green. Once that was good and dry, I started with the blending. Since it's on the back of the banner, I went straight to black. I wasn't looking for anything fancy, just a deep shadow right along the banner pole.
(The far left picture)
I start by painting the area along the banner pole green again. As soon as I have a layer of wet green paint down, I go right over it along the deepest recess with black paint. Remember, you've got to work quick since the paint is drying as you're doing this.
Note: Some folks will say you have to use certain extenders or drying retarders to do this properly. I don't use any of that stuff. I just keep my areas smaller and have a plan before starting.
(The middle picture)
As soon as I have my two colors in place, I wipe any excess off my brush real quick and start blending my black into my green using long strokes running parallel to the banner pole. I only go out as far as I want my shadow to go.
The reason I start with the black in this case is because it's the color I just finished adding and I want to blend it outward from behind the pole.
(The far right picture)
As soon as I'm done with pushing my shadow color (the black) out into my base color (the green), I rinse my brush and dry my brush (leaving it slightly damp) and then I add a tiny bit of green to it and begin working from the pure green area back into the black.
This will push the shadow slightly back towards the banner pole or the point of origin. If it goes too far for your liking, all you need to do is switch colors back to black and make a few strokes to bring it (the shadow) out into the green again.
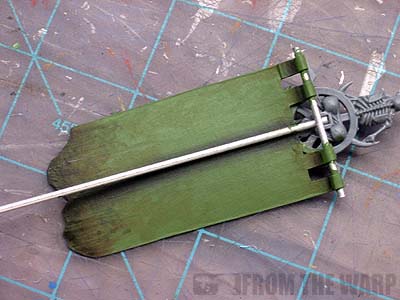
And the end result. The shadow is there along the banner pole and you can see that I've added a few more things to it overall.

Wet blending in different directions
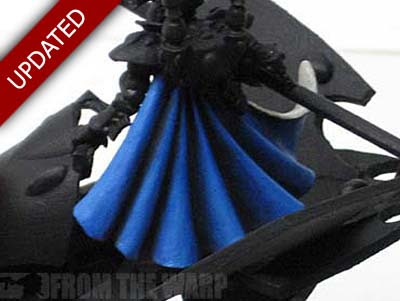
Here's an example to show you that sometimes it's not just blending in one direction. The banner pole had the black go from pure black (behind the pole) outward in one direction into the green. The same was done on the other side, but I had the pole to hide behind. In the case of the folds on a cloak, you have nowhere to hide and you need to blend in each direction... left and right.
With this one, I started with a black base coat and built up to purple. I would start each fold with a thin line of purple along a the outer ridge of a fold and a thin line of black in the adjacent recessed areas.
Then I would blend the purple a little bit to the left and a little bit to the right down into the deep recessed areas along each side of each fold. In the case where I had to put my shadow back in, I added some black and blended out towards the ridges. In the case where my purple wasn't showing up enough, I repeated the purple portion again. Lots of quick back and forth.
And yes, that means each fold is done like this. You can see how the time adds up fairly quickly. In the original example, I started with the red base coat so that meant I had to add my black to the recessed areas and work it outward and up towards the high points. Any time I got too much black on a high point of a fold, I corrected it with red.
You can see how doing something like this can create huge problems when it comes to adding freehand over it. It's insanely hard to correct any mistakes over a super-fine blend like this. Most of time, you'll end up starting the whole thing over if you don't throw the model in the trash before that out of frustration.
But what about white?
Ah, the dreaded white. When it comes to this color, I don't use the wet blending route. I go with a layering approach. I'll start with a light grey color for my base and then add successive layers of white on the high points until I get (build up) the contrast I want. Same for the shadows if need be, I'll add thin layers of a slightly darker grey into the recessed areas. Usually I start with a dark enough grey that I don't have to do this.
For me, white is just not one of those colors I wet blend. Simple as that. Trying to blend white is far to problematic for me and I can get the results I like with layering and save myself all kinds of headaches.

And last but not least are multiple wet blends
Perhaps the hardest of all since the area you're working in is much smaller than what you'd probably like it to be. The only real trick to pulling this off is cutting back on the amount of paint you use and setting clear starting and ending point (imaginary) for where colors will start and stop. The blade of his weapon is a good example of a multiple wet blend... and in a very tiny area on top of that.
Wet blending has it's place. Most of the time I don't use it on models. Layering is the big one I use all the time. In the cases where you have something you want the super smooth blends on, you can't beat wet blending. My Deathwing armour is a good example of that. For the armour plates, I needed the smooth blends and so I had no other choice (outside of an airbrush maybe).
One final note about my brush, water and physically blending the paint
The trick for me with the blending is to have a "damp" brush. I take my brush, rinse it out and then lay the tip on my drying cloth. I just set the tip there for a few seconds until the majority of the water is wicked out of the brush tip. I don't press down on the towel with the brush to get all of the water out, only what will come out on it's own fairly quickly.
You just want it wet, but not so much that it contributes any water to the paint you're blending and accidentally thins it. The reason I get it wet is so that it doesn't absorb any paint when I put it down onto the surface of the model. If it were dry, it would wick up the wet paint and I don't want that. You want only enough water so the brush doesn't pick up paint... but not too much so it doesn't add any water to the paint either.
When you get it just right, you end up using the brush to blend and it does not draw up the excess paint and it does not add any water thinning out the paints. Then you just need to work fast because the paint is drying during this whole process.
UPDATE: The idea of using successive layers of washes in the recessed areas came up as an option to replace wet blending. While it does work, it has it's limitations and does not afford you the control that wet blending does. But... it is still a viable option.

For those interested in that approach, I have this post on that very technique. The post covers the whole model, but the portion on the cloak is where you'll want to focus.
Make sure to check out these posts as they might help:
Zenithal Highlighting, the idea behind it
How to do layering
Freehand and why when you do it is important
