Object source lighting is tough to do. There are lots of folks out there going the distance and making the effort to add this effect to their models and I think it's great. I use it on mine when I find the right places for it as well. The trouble is, it can be very hard to. There are different types of light sources and they give off different amounts of light that will react differently over various surfaces.
Put all that together and you can quickly find yourself in one of the many pitfalls that litter the path to object source lighting. When I first started talking about this, there were a few bloggers who were more than gracious to allow me to use their stuff as examples. This time is not exception and I want to thank L33tLike.us and Watching Paint Dry for allowing me to use their examples as they attempt to solve the riddle that is OSL on their models. Thanks guys!
In no way should this post be looked at as an opportunity to make fun of their mistakes or be taken in any negative aspect. Quite the contrary actually, it can be hard enough to put your stuff out there and even harder to have others critique it especially when you've done the best you can and others are being critical of it.
I've talked to these guys about their stuff and both were more than happy to allow me to use their images in my post here. All that being said, let's look at two examples and some good and bad aspects of each.
Drop pod interior OSL
Drop pod images courtesy of L33tLike.us
Now here's an interesting application of the effect. Fits perfect in my eyes as I can imagine the whole interior of the drop pod being bathed in a blue glow as the center instrument bubble updates information during a planetary descent. Perfect, we have reader buy in that the effect should be there and it's plausible.
This can be a big hurdle on some models, getting reader buy in. If someone looks at it and can't even really believe that the object should be glowing in the first place, they're not going to buy in that the glow is correct either.
The effect is accomplished with an airbrush in this case. It can be a great tool for doing this kind of thing... as long as you use it correctly.

If we look at the piece the effect has been applied to you can see the smooth gradation of the light blue color. This is where an airbrush really shines. Getting those super smooth blends over a surface can be done quickly instead of trying to blend each section by hand with a paintbrush.
The drawback is that you need to be able to control your application of paint so it falls on the "correct" surfaces as the radiant light would actually do.

If we look at the direction the paint was applied in, it appears as though it was done from the top down at a slight angle perhaps. Here's the problem with the application. This overhead direction is incorrect for the light to be coming from the central bubble. That would be more of a horizontal, outward radiating light.

If we were to change the direction we apply our "light" and make it more of horizontal application, it would point back towards the central bubble as our source and not something overhead. The points to note are where the red arrows point to. These spots near the floor would only be lit by a source overhead and the bubble would not be able to light these. Our mind sees this light and we immediately recognize what can and can't be providing the light.
We may not know where the exact source is, but we know it's overhead. The bubble, while painted blue is not the source. In addition, it is darker than the light it's giving off which can be confusing when it comes to recognizing and identifying the source.

When we look at the finished model, we get the effect of object source lighting, just not from the center bubble. It appears as though it's coming from someplace located in the ceiling of the passenger cabin.
To avoid the pitfall of not having your radiant light not come from your source, you need to make sure you apply your radiant light to the correct surfaces that would be affected. Not everything immediately around your source may have "light" on it. It takes carefully mapping out what areas are or will be in shade, what areas are blocked by other elements and so on before applying the radiant light to your model.
Ogre Kingdoms Firebelly
Ogre pictures courtesy of Watching Paint Dry
Here's another example that falls to a slightly different pitfall. That of the distance radiant light travels. Again we'll get reader buy in to the effect since we all know fire puts off light and it's glow is something we're all familiar with. No problem there. The big thing in this case is getting a consistent distance mapped out for our radiant light.
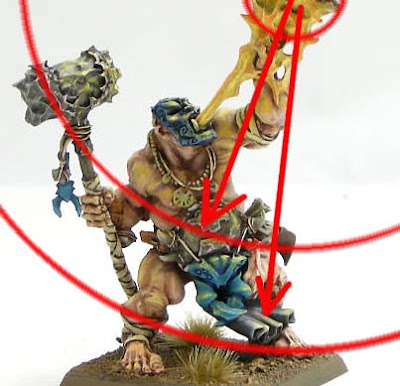
If we look at the finished model, we can see the light travels as far down as the ends of his front tabard. That's a substantial distance for our light source. Not wrong, just substantial which would mean our light source is going to be fairly bright.
You have to decide the distance you want your radiant light to travel each time you do this kind of thing. The trick is to get it to match with your source both in size and intensity. Small sources, large sources, intense sources or dim sources will give off different amounts of radiant light.
Something else to keep in mind is with a source that is bright enough to put off this much light that far away from the source, the objects and surfaces closer to the model will be bathed in a much stronger light and the radiant light itself will overpower the color of the object.
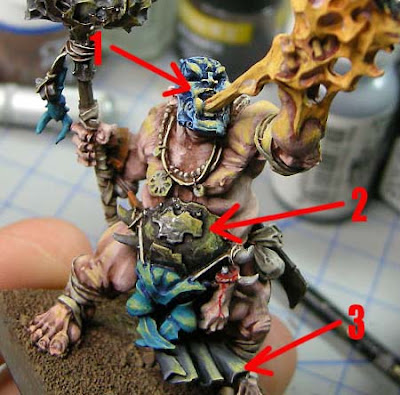
Another aspect you need to keep in mind is the material your radiant light is falling on. Some surfaces will show it or reflect it more than others. If you look at the picture above, you can see three different materials the radiant light falls on. The first problem is that all three are treated the same in terms of volume of light despite the fact they are all different distances away from the source. The further away an object is from the glowing source, the less radiant light it will pick up.
Another problem is that all three surfaces are treated the same in terms of material. The matt skin, the reflective metal and the cloth tabard are each going to display the reflected radiant light differently. Treating them the same kills some of the work you put into making them different in the first place.
Pitfalls can be avoided
You can avoid some of these common problems by taking a few minutes to figure out exactly how your OSL is going to work. Go through the whole model and map it out. Think about your surfaces. I want to thanks the guys for letting me use their examples in this post. Hopefully it's helped some folks get a better handle on OSL.
I've gone through these concepts in the three part series I did OSL a few months back. If you're looking to add this effect to your model, it's worth giving these a quick glance. It might help you avoid a simple mistake and maybe even save you some work when it comes applying the effect to your model.
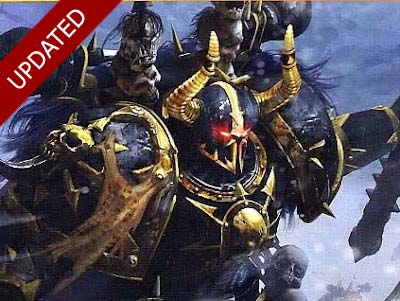
And for those who've read this whole thing, the very first picture is both correct and wrong with it's OSL as well. The reason the eyes glow all the way around like they do is because the artist is showing us the light rays in the atmosphere. It's correct in that respect. It's wrong if you try and duplicate that on a model surface because we aren't doing the same thing when we apply it to models, we're painting the reflected light only, not the light rays like the artist has shown us for effect in their image.
And here's one more example that come from the comments. Dancing Platypus asked about keeping track of radiant light. By that, I mean knowing where it's coming from, the direction it is traveling and the surfaces it will and will not be hitting on your model. Only then can you accurately paint it onto your model. I've borrowed his Skaven flamethrower model as an example.

You'll have to forgive my work here, it's done in Photoshop and I do not know the exact surfaces of the model. This is the best I can come up with to explain the mapping of radiant light.
If you look at the top version, that is the original.
The one below that shows the source and picks an imaginary point (A) outward from the source for the radiant light to travel. Beyond that point, there will be no more radiant light seen on the model. This distance is arbitrary and is decided by how bright or large in size the source may be and will vary in every case.
The third version is the shadows. There are areas, despite being inside the imaginary zone of radiant light that will not have light painted onto them. This is because of the way they are facing or if something in front is blocking the light from hitting it.
The bottom version is the end result. We apply our radiant light onto the remaining surfaces of our model that are within our zone (between A and the source). The closer we get to the source, the brighter or stronger our radiant light is. The further we are away (and closer to the back edge) the lighter or less strong the radiant light will be applied to the model.
Mapping out or keeping track of radiant light is the toughest part of all of this. It's very easy to get painting and keep painting the effect in areas it shouldn't be.
Make sure to check out the other Hobby Focus Articles too!
