
It seems like everyone has an airbrush these days, they're all the rage. And rightfully so, they can help you paint models quicker, in some case better and allow you to get certain effects not easily achieved using more traditional methods.
But not everyone has an airbrush. Including me. I may get one eventually, but for now, I'm still painting vehicles the old-fashioned way... with a brush. And it's not wrong. There are just a few things you need to keep in mind when doing it this way.
The idea for this post comes from a reader email who was curious how to go about painting his landspeeder and Predator tank without an airbrush. I figured I might be able to help and share a few of the things I do when painting my vehicles. I've gone through and pulled photos from older posts that I thought illustrated the important points as I went along.
Starting off on the right foot
It might seem like common sense, but it pays off to start out the right way. By that, I mean making sure you have any unsightly gaps filled, you don't have any excess glue on any surfaces, etc. Make sure you've taken care of your mold lines as well. Leaving those on a model can come back to bite you later on depending on what techniques you decide to use.
And this is even more true when you start using an airbrush as well so it's good practice to do it now.
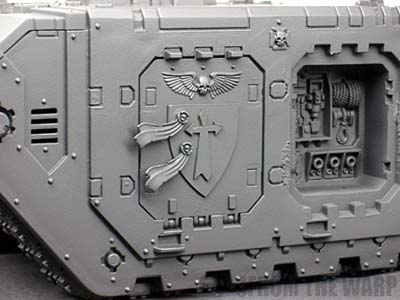
See the glue I missed around the forward hatch opening?
Priming yourself for success
I think priming is one of those things people just do to get it over with sometimes. Trouble is, a bad prime job can make painting your model tougher than it should be. Make sure you start off with the right shade (light for light colors, black for dark colors) and get yourself a nice, smooth coat that isn't very heavy and doesn't obscure any surface detail. You don't want it to be too heavy and you don't want it to create any unwanted surface texture when it dries.
Here are a few articles on Priming models that might help.
Getting a good basecoat down
This is where having an airbrush speeds up the process and can give you a super smooth finish. You can get the same thing with a brush, it just takes a little longer. You're going to want to scale up your brushes. You're not going to be using your tiny detail brush at this point. Tank sized brushes are what you're shooting for now.
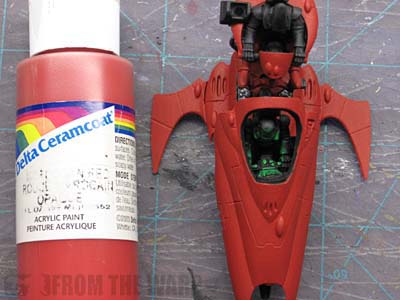
When it comes to painting vehicles with a brush, I add a slight bit of water to my paint. I don't thin it down too much or even as much as I normally would, I just a hair so that it flows on nice and smooth and doesn't leave any streaks. It's the whole surface texture thing... you don't want to add any with your brush strokes.
Another tip is to not leave any puddles of paint that will dry as such. You want your paint to go on evenly and dry consistently. Too much water and you'll end up with uneven surface colors similar to when you thin washes or use to much and you're left with watermarks around the edges.
Something else to think of is to paint whole sections at once. Don't paint part of an area, let it dry and then come back to it to finish it. You'll end up with a "line" of surface texture where the two layers of paint overlap. Try and always keep a wet edge to your paint and finish one area completely before moving onto another.
Getting a basecoat might take two good coats with a final third touch up coat in key spots for smoothness. It won't take you forever if you primed your model with a color that will help you and you thin your paints slightly so they go on smooth. That big brush will cover lots of surface area quick. Make sure you let your coats dry completely before adding another one or doing something over it.
Getting the basecoat down is the biggest hurdle. After that, the rest is detailing. Things like tracks, headlights, accessories and so on. Those are going to bring your model to life. The only thing we have before we get to those details is some highlighting and shading.

Shading and highlighting, picking the long road or the short road
Shading can be done a couple different ways depending on what kind of surface your vehicle has (how much surface texture... think IG tank vs Eldar serpent).
I prefer to do it with some control in my application of my washes. By that, I mean applying my wash to the areas I want it and not just covering my whole vehicle with it. A good example is the purple panels on the Rhinos above. The wash is applied to the recessed areas along the edges of those particular plates and not just thrown onto the whole purple area. I'd add to that I do my shading before I do my highlighting in most cases.
When it comes to highlighting, there are two ways I have for doing it.
Drybrushing or line highlighting
Both methods have their good and bad points.
Drybrushing is much quicker, but the end result may not be as clean and neat as actually going in and line highlighting every edge. Line highlighting will take much longer than drybrushing will especially if you do two highlights for some contrast.
Both will need some clean up, but that depends on how neat you are when you apply your highlights regardless of the method you choose.
I'm not going to get into painting camouflage patterns, adding extensive freehand work and doing things like zenithal highlighting on a vehicle here. That's a bit out of the scope of this post. It can be done, but it requires some modification to the process and is something that will take a bit of research before starting.
Painting the details, weathering and bringing your tank to life
Once you have your basecoat down with your shading and highlighting, this is where you bring it to life. You take that huge chunk of mono-colored armour and pull out all the smaller details. Painting these smaller elements is similar to painting troop models. You can use the same formulas you use there here... you're just going to scale them up a little more. For example, you paint your tracks like you would your gun barrels. Basecoat of black, follow that with Boltgun metal and then a final wash of Badab Black.
Since weathering is a whole different animal, I'm going to point you towards these posts that go over a few different weathering techniques you can use.
The key to all of it though is starting with a "cleanly" painted model first.
So what's it all come down to?
Painting vehicles with a brush can be done. You don't have to have an airbrush to get a nice looking vehicle in the end. Just keep these things in mind:
1. Start out right. Prep work is important here.
2. Prime with a color that will help you and not create more work.
3. Get a smooth basecoat by thinning your paint ever so slightly.
4. Keep a wet edge to your paint and finish whole areas before moving on.
5. Shade with some control, apply only to the areas you need shaded.
6. Pick your highlight method and be as neat as possible.
7. Pick out your details to bring your model to life.
Hopefully this gives those of you who don't paint many vehicles an idea of where to start and a few things to look out for. I'd add that it might be in your best interest to paint things in sub-assemblies as well where possible. For example, Land Raider side sponsons. Paint those separately and then attach them to the model. Things like that will help you get to the hard to reach areas.
Take your time, let your coats dry and you'll be fine. Airbrushes are great for blending and getting nice smooth coverage on models, but there's more to painting a vehicle than using an airbrush.
Make sure to check out these posts as they might help:
Line highlighting made simple
Drybrush highlighting vehicles
Using sub-assemblies when painting
