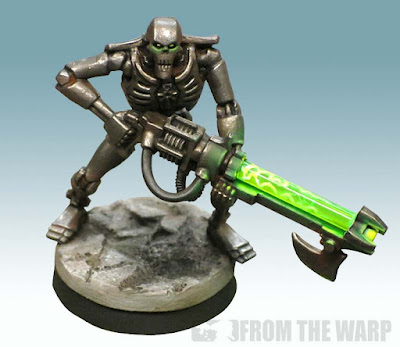
Let's start this one off with there are lots of ways to do it... this is how I go about it. It's maybe a little more work than the "drybrush boltgun metal and wash" approach, but I think it's worth it.
With the release of the new Necron Codex, I decided I would hit up my FLGS for some Necron models to practice on. Turns out, they were all swept up recently in anticipation of the new book hitting the stores. I did find one of the guys in my gaming group who was more than willing to loan me his since I was going to be giving them back painted.
A note about this particular process: Now that I painted this guy up and wrote the whole post, I've got to say it's not a conventional approach to painting Necrons. It involves some techniques that not everyone may use or be familiar with. As far as varnishing the model in the end, it may be difficult to do given the techniques used as well. That being said, I figure it's still worth sharing and folks can use what they want from it.
Getting started on the right track
It's important you don't prime your model and then just drybrush on the metal basecoat. It doesn't give you the same effect as if you painted it on properly.
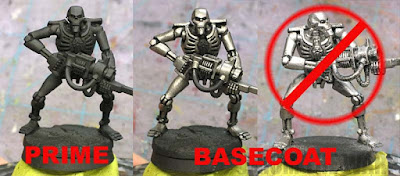
I've talked about what happens if you drybrush something to get it painted and then try to weather it afterwards. It just doesn't work. And since we're going to be making this guy look weathered, I need to start off right. I need to start with a "clean and undamaged" Necron warrior.
A benefit that you get with painting each armour section is well defined shadows. It helps the viewer understand what they are looking at and recognizing what things are. Drybrushing brings out surface texture of something and doesn't always help define the shape of the object. It's only when the surface texture contributes to the shape that it really works. Hair and fur are perfect examples.
Making our Necron warrior look ancient
The first step is basecoating with GW Boltgun Metal. With our basecoat down, it's two washes with GW Devlan Mud followed by a last wash of GW Badab Black. This gets our warrior suitably dark from built up grime so that we can show the areas that are worn back down to clean metal due to operating.
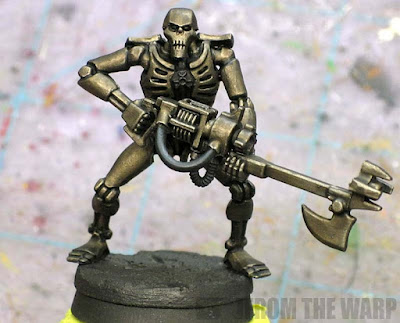
I start with two passes of the Devlan Mud finished off with one pass of GW Badab Black to give him a warm color and add some variety to the model. You could do it with just black, but the model gets so flat looking to me in the end. I like the dark browns in the recessed areas later on. I think they add to the grime effect and contrast well with the highlights.
Highlighting the model
In this case, I'm not highlighting as much as I am showing all the edges that the grime has been worn away and all that's left is the "clean" metal underneath.
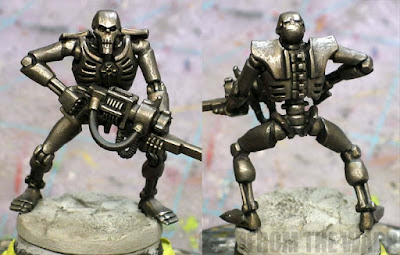
This is done with two things. First is a pass with Metallic Iron weathering powder from Secret Weapon Minis to bring out the general areas and then a regular pencil along the edges of the armour plates.
Here are two posts that look at these techniques a bit closer
Using metallic weathering powder
Using a standard pencil for weathering effects
The powder is applied to the larger areas of the model to represent areas that might be kept "clean" due to movement and such. Same goes for joints that operate that grime will not be able to collect on the metal surfaces. The pencil is to really make the edges pop out and add some scratches and such to the armour plates themselves.
Adding the rust
Since these guys lay dormant for hundreds or thousands of years, they are bound to rust. That's my take on it. So I wanted to add that effect to my model. The other thing it does is add some contrast to all the metal figure.
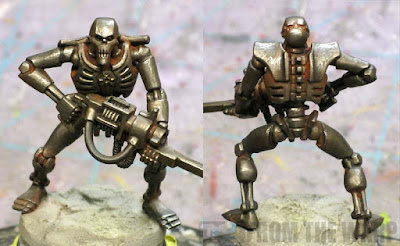
I went through and added another weathering powder called Rust Red. Most of the time, you want three shades of a color for variety, but in this case, I went with only one. I didn't want any "new" rust and just wanted to add a touch of the effect to him.
It gets applied to almost all the joints and any overlapping armour plates. Don't put in every single joint since you'll want some variety throughout your squads. Necrons will rust in different places at different rates depending on what they have been exposed to over time.
Painting the Gauss weaponry
And the final touch to this guy. I wanted to keep him in line with the classic or regular look of Necrons as most folks know them. Since I did not do much along the lines of actually painting him (he's just a chunk of highlighted and rusted metal)... I wanted my Gauss weapons to have that extra touch and make the model appear to be painted to a higher standard overall.
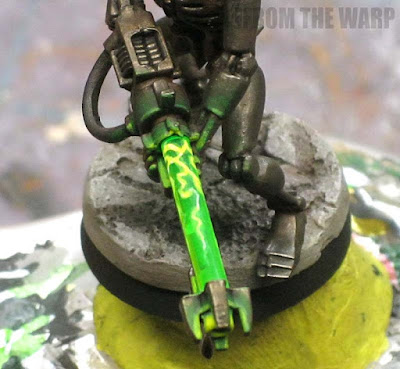
I did two things to make the weapon stand out. I added a lightning effect and did a little bit of object source lighting.
The lightning effect
1. I added some lightning effects to the glow rod itself. Not terribly hard to do with a fine tipped paintbrush. A few squiggles starting at one end in white paint that are carefully gone over with a yellow wash (thinned bright yellow paint). Using white paint for the lightning makes them stand out from the brightness of the glow rod and the thinned bright yellow wash makes them appear to be part of it. You want the contrast, but you don't want them to appear out of place.
Object source lighting
2. To make the glow rod appear to be glowing, I added the effect onto the model. Using all the principles I outlined in the 3-part series I did on OSL, I went through and added a very slight glow to the weapon. I didn't want some huge glow from the weapon, but just enough to catch your eye and let the viewer fill in the rest of the effect.
I also did this to his eyes. I was hesitant to add too much "glow" to the model and settled on just the barrel of the gun and his eyes. I did not make any cables or ribbed chambers look like they were glowing. I wanted just a touch of the effect. It needed to enhance the model, not overtake it.
The glow itself is painted with successive layers of GW Snot Green. On it's own, it's a semi-transparent color so it takes a few passes to get the color strong enough to be seen. I was able to use this to my advantage.
I thinned my first few passes and then used it at full strength as I got closer to the source. For right next to the gun barrel, I added tiny touch of the bright yellow to lighten the Snot Green up.
I opted to make the very end of his barrel appear to be glowing as well. It's not a part you usually see highlighted or turned into a glowing effect, so I thought I try to see if I could pull it off.
The basing and finishing the model
I set this guy on a resin base and kept it's tones muted. It's slightly lighter since the model is somewhat dark in order to provide a little contrast. The last thing I did to the model was go over the weathering powder effects with some alcohol to "set" the powders in place and prevent them from rubbing off so easily. For those wondering about that, I've got a few posts on "fixing" powders in place here.
All in all, he went real quick up to the point of the OSL. That effect took longer than it did to paint the rest of the model and the base together. You can always leave the effect off your model and crank these out in an assembly line fashion. It'd take no time to get a squad of these guys done then.

Make sure to check out these posts as they might help:
Another way to paint metallic silver
Guest Post: Airbrushing Necrons
Object Source Lighting, an in-depth look at the idea
