Here it is… my tutorial for building Pre-Heresy type Terminator shoulder pads.
Notes:
1. I’ve added the rest of the building process to this tutorial because adding these shoulder pads changes a few things when I’m assembling the Terminator.
2. This is for a Chaos Terminator, but the process could be done just the same for a Loyalist Terminator.
3. This tutorial is a bit long but I think it’s all important information.
4. This is a bit above beginner level but still feasible with some patience and effort.
Supplies Needed:
Your model
X-Acto knife or similar hobby knife with NEW, SHARP blade
***If you aren’t going to take the time to get a new blade for this project, then stop reading right now. There is a lot of detail work and fine cutting that needs to be done and if you have any hopes of accomplishing this with any degree of success… you need to have a NEW, SHARP blade on your knife.***
Superglue (preferably any kind that is not too thick in consistency)
White glue
Fine point drafting pen (needs to be a real fine point for detail work)
Posterboard or similar thickness cardstock
Index card or similar thickness cardstock
Cereal box (you need the cardboard the box is made of… not the cereal)
A small nail or similar type tool with a fine point
Greenstuff
Modeling tool (doesn’t matter what brand, I use the GW one and my X-Acto knife
STEP 1
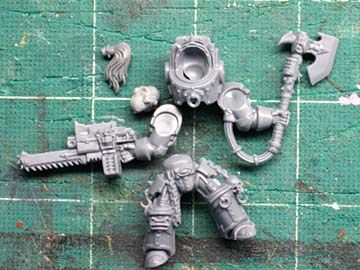
Collect your pieces and trim off all the mold lines.
STEP 2
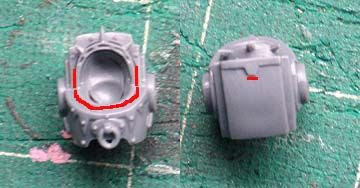
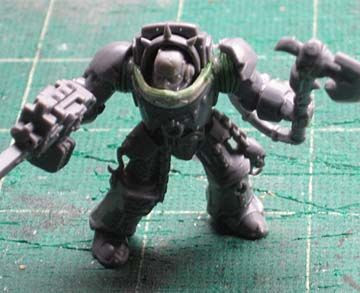
Assemble the torso halves. You will need to trim away any spikes, rivets, etc. around the neck area (red line) so the collar piece will fit later. If there is anything in the way on the top of the model, trim that away too (the spiky point in the case of the Chaos Terminator).
STEP 3
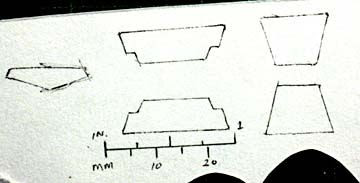
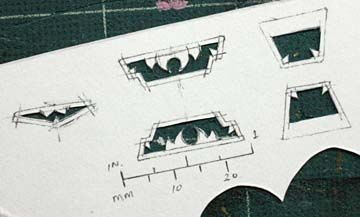
Take your templates and trace their outline onto a piece of posterboard.
I’ve added my templates here with a scale in inches and millimeters. You can copy this picture, print it out and then take it to a copier and reduce/enlarge until you get the scale on the drawing to match a ruler in real life.
There is one piece for the collar and two pieces for each shoulder pad. Obviously you will need to make each shoulder pad piece twice.
Fellow Blogger Not Yet Done has a great set of downloadable shoulder pad templates that can be used with this tutorial as well.
STEP 4
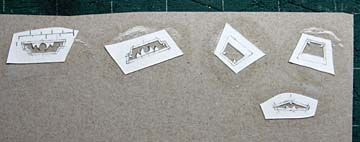
Once you have your shapes traced onto the posterboard, you can take your time and design the “trim” that will be on your shoulderpad. Using your fine point drafting pen, draw the pattern you will be cutting out in a few minutes.
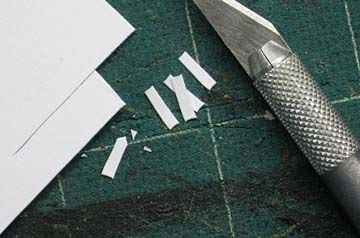
Once you have the collar and shoulder pads drawn out, use your X-Acto to “cut out” the INSIDE of the design. Take your time and be careful. Neatness really counts here and it will take a steady hand with a new blade. Do not cut along the OUTSIDE of the template yet, that will be done later.
STEP 5
Once you have all your shoulder pads “cut out,” take them and use a thin layer of white glue to glue them down to the cereal box. Set them aside now and let this dry completely before going any further. You’ve gotten this far, you don’t want to mess it up because you are impatient.
STEP 6
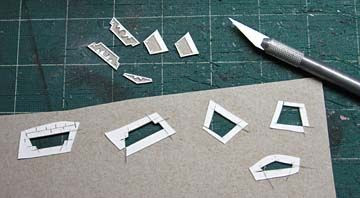
Cut out the templates from the cereal box. This is where you cut along the OUTSIDE of the template edge now. Again, take your time and be careful.
STEP 7
Set the collar piece aside for now.
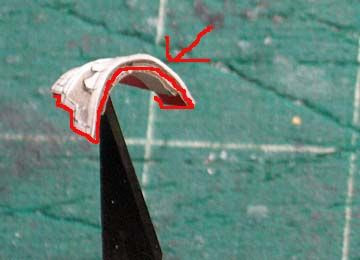
Time to glue the two parts of the shoulder pad together. Make sure the edge nearest the torso lines up flush (the red arrows) and superglue the two pieces together.

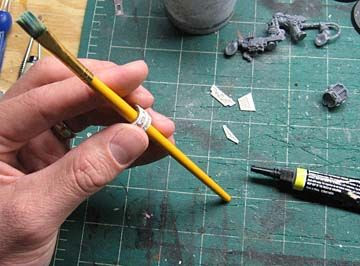
STEP 8
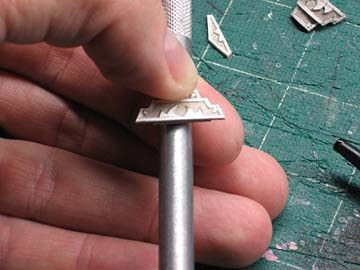
Once you have the two parts glued together, give them a few seconds to start setting and then it’s time to bend the shoulder pad to the correct shape. The first time I bend the shoulder pad, I use the handle of my X-Acto knife. I set it perpendicular to the X-Acto knife handle and use my thumbs to SLOWLY press it down on each side. Once I have it bent to the curve of the X-Acto handle, I then take and wrap it around the handle of one of my larger paintbrushes. The diameter of the paintbrush is slightly smaller than the X-Acto handle and allows me to get it into just the right shape.
Since you started doing this while the superglue was still drying, the superglue should hold the shape of the shoulder pad now. You can test fit the shoulder pad on the model and make any adjustments to the curve as needed.
STEP 9
Now it’s time to seal the edges of the shoulder pad. I use my X-Acto blade as a mount and take my superglue and apply a small amount around the entire edge of the shoulder pad. Since you should have superglue that is not too thick in consistency, it should quickly absorb into the cereal box. This basically turns the cereal box and posterboard into plasticard. Once you have both shoulder pads assembled, shaped and sealed, set them aside for now to dry. On to the collar now.
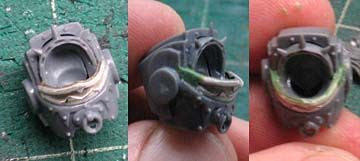
STEP 10
Time to attach the collar piece. You can pre-bend the collar piece by wrapping it around the handle of your X-Acto like you did for the shoulder pads. Take a small amount of superglue and apply it to the front edge of the torso and hold the collar piece in place until the superglue dries. It might take a little more superglue on the inside of the collar piece and near the back edges as most of the superglue will be absorbed by the cereal box the first time around.
You will need to greenstuff the back corners of the collar piece where it meets the back half of the torso. I would also apply a very small amount of greenstuff to the top lip of the collar to smooth it out and get rid of any irregularities since this will be a highly visible part on the model.
STEP 11
Time to attach the arms. I like to make my arm positioning a bit dynamic but it’s ultimately up to you. There is one thing to keep in mind when attaching the arms though.
Since these shoulder pads are attached differently than later model shoulder pads and don’t “float” with the arm like the older ones do… you need to make sure a few things line up so you can glue these in place correctly.
Line A shows that the tops of the actual arms need to be the same. In this case, I had to trim part of the left arm down so they were even.
Lines B and C show that the arms need to be positioned the same from front to back. Again, this is because these shoulder pads are different than their later versions and if you just place your arms on your model without giving any thought to consistency, you might end up with shoulder pads that don’t match in terms of height and front-to-back placement.

STEP 12
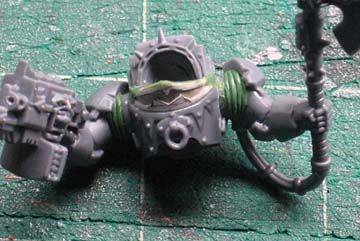
With the arms superglued and trimmed, it’s time to add some greenstuff in the shoulder joint to fill the gap. You shouldn’t have to worry about this part if you simply glued the arms in place without having repositioned them.
STEP 13
Time to assemble the model.
Glue the torso onto the legs. Add your head to the model. I use a NON-HELMETED head for this as it is the only kind that really fits. You could add the head prior to attaching the collar but I found it makes it tougher to position and greenstuff the collar in place.
STEP 14
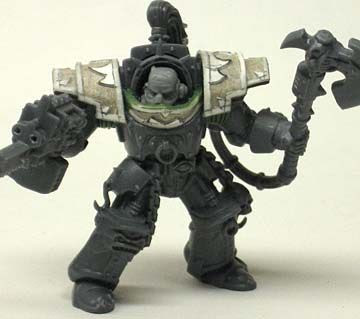
Add the shoulder pads and top knot at this point. You should be able to superglue them in place without any problems.
STEP 15
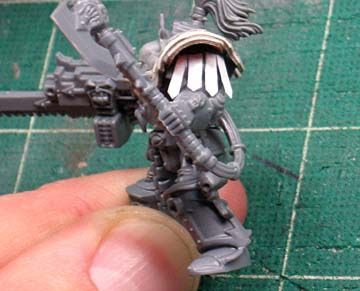
Time to add the leather straps that hang below the shoulder pads. Take a small piece of index card (you could use the slightly thicker posterboard as well) and cut out small strips. The length and width is determined by how low and wide you want them to hang. I angle the ends of mine as well by cutting the bottom corners off. I usually add 4 to 5 leather straps under each shoulder pad. Simply superglue them in place right under the shoulder pad and let them hang in place.
STEP 16
Finished… almost. Time to add the rivets to the armour.
Using a nail or other sharp pointed similar object, place a tiny drop of white glue in the places you want rivets on your shoulder pads. It usually takes me 3 passes with tiny drops of white glue to get the “rivets” built up enough.

I didn't think about this the other day until I went to add the rivets onto the second set of shoulder pads I was making.
To make it easier when applying the glue rivets (since you need to repeat the process about three times) in the same place for consistency... mark where you want the rivets to go before you put any glue down. This time I used a small drafting pen and made small black dots on the shoulder pads where I wanted the rivets to be.
On the picture above I went over those locations with red dots to show you what I mean. This way, when you go to make the second and third passes with the glue to build up the actual rivet, you can make sure they all end up in the same place and not just "close." This way you get a nice, clean looking rivet in the end.
That’s it.
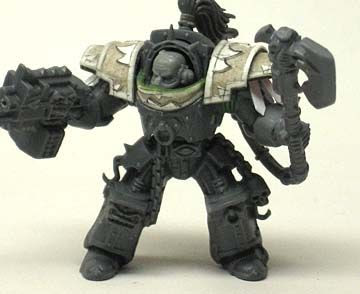
Remember, take your time and be patient when doing this. It’s fairly detailed but the end results are well worth it I think. Here's what he looks like unpainted.
And if you're looking for how to add to this, you can check out this post on how to make leg armour plates for your terminator as well.
